Wednesday, April 29, 2015

We have to get moving

It's a week until we are scheduled to go into the water and we still have some stuff to do. Sure, the chances of getting in on the date requested are slim to none, but we like to be ready on time, even if the boatyard isn't.

With that in mind, we skipped out of work for a few hours today finish caulking a few spots so we can put the rub rail back on Saturday and take the bridge enclosure down so we can get a zipper re-fastened.

When we got to the boat yard, they were installing new pilings to replace the ones that were carried away by the ice last winter. We didn't have a lot of time but we had to stop and watch how these guys actually drive a 50 ft. piling into the river bed. Each piling takes perhaps 20 minutes and these guys work only for cash.


The tug is really small and its "steering station" is on its roof. The barge is 50-60 ft. long and carries a giant air compressor, a crane and a half dozen pilings. There appeared to be four crew members. They anchor in the river by dropping a long steel tube through a hole in the barge.


You can see those two long anchor tubes in this shot that we took while they repositioned the rig to drive in another piling. Once they get where they want to be, they put a piling over the side and lower a compressed air hammer over the top and begin whacking it down into position on the river bottom.

Once the piling is in place and at the depth they want, they use the crane to pull out the long metal tube that has been holding them in place and move on the the next spot. We know that this type of work is done everywhere but it was still fun to watch.

Then it was off to the shed to caulk those little spots so we can reinstall the rub rail and then take down our bridge enclosure. That's always a fun job and once again this year, we ended with all that canvas wrapped around us. We did get it off and tomorrow it's off to get a zipper fastened back in place.


Sunday, April 26, 2015

(Un) Screwed


Back on the boat for another weekend of fun and frolic. On Saturday, we removed another long section of rub rail. There are two more sections that join at the transom but we're going to save those for next winter because we have quite a long list of things to do and we just don't have time to screw around with these last two short sections. Pun intended.

Last weekend when we removed the big section of rub rail that runs around the entire front of the boat, one screw refused to cooperate and we had to drill the head off. The remaining part of that screw had to come out, obviously, and we managed to get our Vice Grips around what was left of it and extracted it nicely.

Next time we take a picture like this, we'll draw an eye on the upper jaw of the vice grips so it looks like a fish.

We took this next section of rub rail out into the sun, scrubbed it with a Brillo pad and then waxed it with Flitz. Flitz requires a lot of rubbing but it is amazing how good these scratched up old rub rails look.

A note about waxing: We use old, white athletic socks to apply the wax and another sock to polish. Of course, we don't wear white athletic socks but we must have, sometime in the past, because we have dozens of them in our sock drawer. We wax with them (hand inside for extra traction) and then take them home, wash them and then let them air dry. They are great for polishing stainless tubing used on bridge enclosure. Full disclosure: we learned this trick from a dock mate several years ago.

The area under that rub rail where the hull and deck meet was filthy so we went around that entire area and scraped out all the loose caulk and wiped it all down with a wet cloth. Next step is to re-caulk that entire joint and then reinstall the rub rail.

On Sunday, we did just that but before we started with the caulking gun, we scratched a few little things off our list. One of the mounting bolts on the starboard raw water pump needed a lock washer. Done. (Glad we keep good notes.) The hose to that same pump needed be be changed for a new one. Done. Then we needed to fasten the passive vent hoses on the starboard side up and out of the way where they pass close to the new exhaust manifold. That was also done with a minimum of effort.

The starboard engine needed to be filled with antifreeze. We poured in 4 gallons through the heat exchanger but once the engine starts, we'll have to add some more. Have to get all the air out of that cooling system.

Then it was time to apply the 3M4000 to the area under the rub rail. What fun that caulk is! We can't think of a gooier or less pleasant stuff to deal with but, we put up the old extension ladder and caulked every hole, crack and joint. (We did let the 3M4000 cartridges warm up on the hood of our car before applying it. It really makes the goop easier to apply.)


The caulk takes 24 hours to set up so we left it to do its thing. We have a other few small spots to do and we'll take care of those one afternoon this week when we can skip out of work for a few hours.

We shot some video of the boat yard before we left. We love the sound of all those sanders, drills and vacuum cleaners in the spring. You may find it boring so be advised.  Hey, we do our best.


Thursday, April 23, 2015

No problem with the Connecticut River this year


We took a quick lunchtime tour of the Connecticut River in Portland today to see how high the water was. Thankfully, the lack of rain and the very slow snow melt in Massachusetts and Vermont has kept the river under control.

We wanted a more dramatic photo so we hiked halfway across the Arrigoni Bridge between Portland and Middletown. The river was certainly moving fast and there was lots of debris but it had come up only 6-7 feet. Minor flood stage in Middle Haddam (the closest depth gauge south of Portland) is 7 feet and that's just about where the river was.

We made a quick visit to the marina and the crew was moving the docks into place, ready to put them in the water as soon as the new pilings are installed. We're sure that will take some time and that will probably delay us from getting the boat in.  But, we still have some minor things to do so we'll be kept busy.

The bottom of this stairway is usually about 5 ft. above the water

The spring freshet is the only drawback to winter storage at Portland Riverside. In the almost 30 years that we've had a boat here, we've only floated off the poppets once and that was in 1988. We were on the boat as she floated and we started the engine and, when it looked safe, we motored down the driveway very slowly and tied the boat to one of the buildings. They came and got us with a rowboat.

That year, the crew towed every boat that could float out into the river and anchored them, ours included.

A number of times over the years we've had water come up far enough to get into the shed where we're stored but not quite far enough to float us. We keep a pair of waders in the garage for the next time that happens.

April 2007 - the last time water actually came into the shed

Monday, April 20, 2015

Finally, out of the bilge

Winter is over and spring has started, albeit rather abruptly. The last of our cylinder head replacement project is now behind us and it was time to tackle our next project: remove and reseal the rub rail that runs all the way around the boat. We started to see some small leaks in the v-berth and since Silvertons are known to have issues with the joint where the hull and deck meet, it was time rehabilitate that area.

The hull-to-deck seam is actually like a shoebox, where the deck section, like the top of a shoe box, goes down over the hull section to make a nice tight joint. The two are held together with screws, every eight inches that are countersunk into the deck. Over that, Silverton mounted a very heavy stainless molding, about two inches wide that covered the seam completely. That molding was fastened with #12, 1-3/4-inch sheet metal screws.

We elected to begin with the most difficult section of molding: the one that covered the bow and went back about 20 feet on either side. Did we mention that there were a lot of old screws to remove?  There were about 50 and only one refused to come out until we drilled the head off. Many of those screws were bent slightly and in most cases. the heads had deteriorated somewhat.

We had to bring our extension ladder to the boat to get up that high, and climbing up the ladder, removing one or two screws and then going down to reposition the ladder, was really wonderful exercise.


We attached lines to the rub rail and when the last screw was out, were able to lower this thing to the ground.

This was not a one-person project and Frances was there to help lower this awkward hunk of molding and then take charge of making it look like new. There was a rusty-looking deposit around some of the the screw holes, especially the ones around the bow. The former owner had attempted to seal that area by adding some type of caulking - lots of it - between the bottom of the molding and the hull. Most of that just fell off as the last screws came out and the molding was pulled away.

Frances cleverly marked the rub rail before we took it completely off. No sense in hauling it back up for re-installation only to find that it was upside down.


Our approach to cleaning the rub rail was low-tech; Brillo pads worked perfectly. Frances spent a lot of extra time on the stains around the screw holes.


Once the rub rail was nice and clean, We applied some Flitz Polish-Paste. We bought a tube of this stuff at the New York Boat Show about 10 years ago and have used it around the house from time to time since then.


It really worked well on the rub rail and while we were at it, we tried using it on some bad smudge marks we had on the hull. It took some rubbing, but Flitz removed the marks completely.


There's a lot more to do before the rub rail can be reinstalled. We'll have to remove any remaining failed caulking in the hull-to-deck seam. It appears to be 3M 5200 and most of it, except around the bow, seems to be in fairly good shape. Then we'll re-caulk that entire seam with 3M 4000, the sealant recommended by Defender Marine.

The person we talked to at Defender (who really seemed to know what he was talking about) said that most boat builders at the time used 3M 5200 to seal that joint and that over time, the 3M 5200 would harden, crack and lose its sealing quality. In contrast, 3M 4000 is a more recently developed  product that is equally tenacious but never really hardens. We hope we'll never have to test that particular product claim.

It will take us another 4-6 hours to clean up the exposed hull-deck joint, remove any loose caulking and then apply the 3M 4000 to the entire joint including the screw holes. Once the 3M 4000 cures for 24 hours or so, we'll haul up the refurbished rub rail and fasten it in place with all new stainless screws.

Wednesday, April 15, 2015

The missing oil filler cap

"Chrysler Oil Fill Cap with hole"

As we began the cylinder head replacement project late last year, we removed the old oil filter cap from the engine, took it home, ran it though the dishwasher (sorry Frances), then primed and repainted it.

Then, as we reassembled the engine with its new heads, we couldn't find the damned thing. We searched everywhere but it never turned up. We couldn't just forget it because it's part of the passive crankcase ventilation system. So, we began a search for a new oil fill cap.

Were the hell were we going to find a small part like this that's used a 35 year old engine? 
We tried the Internet and once we had the part number, this seemingly insignificant part was everywhere. Or so it seemed. Many of the marine parts websites that came up in a Google search listed Chrysler Part Number 4417421 as "Chrysler Oil Fill Cap With Hole" and every website used the same picture. In fact, every site showed 100 of them in stock.

Not only that, but beginning on the day we first found the correct cap on a website, that same photo of the cap and its description began appearing on every other unrelated website that we visited, served up by Google, no doubt. It's still showing up and we bought that cap 10 days ago. So much for search relevance.

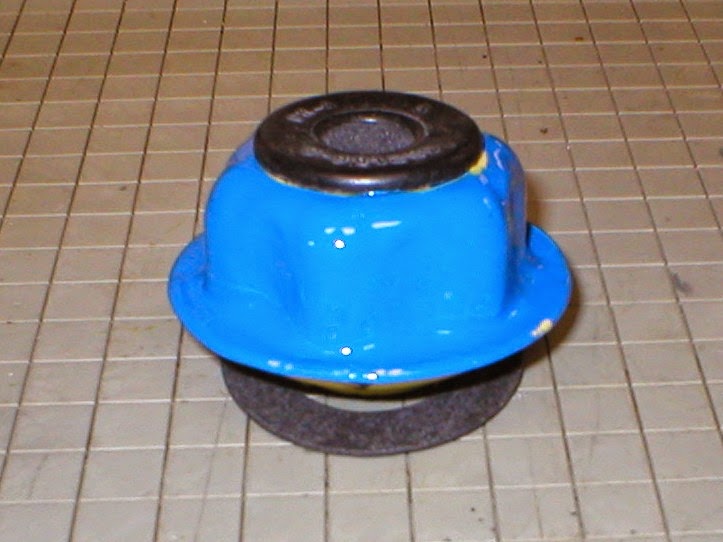
So, why not just order it? From the description, especially the "with hole" part, made us suspect that the cap didn't come with the grommet (shown in the photo above) that is needed to hold the fitting on the vent hose in place. We asked about the grommet at three well known marine parts websites and only one bothered to reply and that with just a cryptic, "Just the hole."

This was beginning to eat up a lot of our non-work time, so we ordered the cap "with hole" ($9.95 plus another $8.00 for shipping) and then went searching for the grommet. That took a lot of cross referencing part numbers but we finally found the grommet at a website that specializes in Mopar parts for car restorations: Bill Rolik Enterprises in Hasbrook Heights, New Jersey.

In you're into restoring an older Chrysler car or truck, this guy's website is really worth exploring. Need the absolutely correct intake manifold bolt for a 1969 Plymouth Cuda? Bill Rolik looks like he'd have it. .

Before we could order that elusive grommet, the cap we had ordered arrived and yes, it came with the grommet installed in "the hole."

What we learned
First, we suspect that none of the sites we visited searching for this cap actually had it in stock as they said they did. Sure, someone, somewhere had a bunch of the NOS caps but it certainly wasn't the site we ordered from.

This type of parts networking allows people to get into the marine parts business by simply buying the right software. They don't stock parts but simply take orders and have parts drop-shipped from some other vendor. 

Customer service is a joke at many of the sites that populate a Google search for a small part. Even the one vendor who took the time to answer my question was wrong.  He or she had never seen Chrysler Part Number 4417421 and obviously didn't care whether we bought it or not.

There is something vaguely dishonest about how all this now works. The true source of the part slaps someone else's return address on the box so we'll think it came from where I ordered it. The true cost of the cap was probably a few dollars but everyone in this misleading supply chain gets their mark-up. Who cares? Boat people will always pay up, right?

We don't want to paint with too board a brush here. We know and deal with a number of reputable marine parts suppliers that have invested millions in inventory and who employ real, knowledgeable people who can and will answer questions, even if they don't make a sale. I'd include Defender Marine and Lighthouse Marine Supply as two that we have had excellent experiences with over many years of owning a boat, and we're sure there are lots of others. Unfortunately, none of our preferred suppliers had a Chrysler Oil Fill Cap With Hole.

OK, time for us to get back in the bilge.


Sunday, April 12, 2015

Finally, a nice weekend


Hard to believe that it was snowing two weeks ago, but this is southern New England. The weather changes fast at this time of year.

With a temperature in the low 70s, many of the boaters showed up to begin recommissioning for the summer season. At Portland Riverside (and a lot of other boatyards, we'd guess), "recommissioning" means standing around with old friends and talking about last summer, or their grand kids or how difficult it is to change one of their sails.

Not us. We went right to work. Okay, we did stop and chat with Rob, the guy who owns the boat next to us.

The first order of business was to replace the sea water pump on the port engine. We'd already changed that pump on the starboard engine and since we have no idea about how long these pumps have been in service, it made sense to change both of them. It helps that we found two new pumps on the boat when we bought it.

If you are reading this blog and have a Chrysler 360 marine engine, this is the seawater pump you have.


This a  Sherwood G7B pump. It's all bronze and there are rebuild kits available for it. New ones cost just north of $300. For these engines, Chrysler Marine made a bracket for it that bolts to the block and the front of the circulating pump.

Here's what it looks like before we installed the upper hose.


Getting this pump on is at least a 30-minute job, at least for us. If you are mounting this pump on a Chrysler LM-318 or LM-360, it goes much faster if you remove the upper hose and then the mounting bracket with the pump still attached.

We're going to rebuild the two old pumps (if we can get them apart) and keep them for spares.

Our final job for Saturday was to replace the forward starboard deck hinge. Isn't anything easy on a boat? Turning out old stop nuts while reaching around behind the engine hatch to hold the bolt in place was a new kind of exercise. Eventually we quit and went home with just one old nut refusing to come off.


On Sunday, we split that one last nut with a hacksaw blade and then got into this awkward position and mounted the deck hinge. Took us almost an hour and it would have gone faster if we had longer arms. A lot longer.


Finally, the new hinge is in place. Now we'll have to paint the hatch covers to cover the marks left by the old ones


We got some other things done on Sunday before we headed up to the airport to pick up Frances who was returning from two weeks in Florida visiting her family. Good the have her back!

Sunday, April 5, 2015

Just about finished


 It's Easter weekend and the river looks pretty good. No a lot higher than normal so if it doesn't rain a lot in April, we're good to get out of here on schedule.
 
It's somewhat disturbing to look back and count how many weekends this project to replace the cylinder heads on our starboard engine have actually taken. We started in early December and now it's April 5 and we can finally say that the project-from-hell is actually complete. Well, OK, maybe we do have to put on one last hose, but you get the idea.

While we're feeling sorry for ourselves, it's worth noting that we took six weeks off during that very cold weather in February.

On that subject, we talked to another boater today and we related how we had to get help lifting the new manifolds up onto the boat. He offered that, "Your brain is a teenager and your body is... well."  Good comment, although our minds are a little better than " teenager," at least most of the time. As for the remaining body parts, he had a point.


Hopefully, this is then last time you'll see Bill down between the engines. But, notice, all the tools and wrenches are gone? Good sign!

On Sunday, we hauled down our monster Shop Vac, not the one shown in the video, but a true master sucker. Fitting that thing down between the engines wasn't easy but once there, we pushed the hose down into all of those little places where the sun never shines under the engines. It is so satisfying to hear the debris from from years past getting sucked up. We pulled out lots of old gunk from sloppy oil changes in the past (not from us, of course). The super sucker just inhaled it.

The best part was opening the vac to see what treasurers it held. Lots of little pieces of crap and about a half dozen assorted nuts, washers and two 3-inch bolts. We have to assume they had been there for years.

Anyhow, our bilge spaces are clean. Our problem engine is re-assembled and we are free to begin our next project: sealing the joint between the deck and the hull.

We're sure you can tell that we're excited about that.

google-site-verification: google9a2975e3a65bc350.html