We did get to the boat on Saturday but inside that metal shed it was about 29 degrees by the thermometer in our galley. We stayed for about 90 minutes while the batteries charged but with the heavy coat we had on, we couldn't even get our arms inside the galley cabinets to see if we could disconnect the old water lines. We finally gave up. It would have been warmer if we had gone skiing.
During the past week, we did find a replacement faucet that had the same general design as the old leaky one. The "marine" faucets were ridiculously expensive and the ones we saw at Home Depot and Lowes were just too ugly. Frances remembered seeing one very much like our old one at Wal Mart last summer. We stopped at our nearest Wally World and found five of the faucets in their tiny plumbing department. One of the five was still sealed in the original box so we grabbed that one and paid $46.00 for it. Turns it, it looks pretty good and fits as it's supposed to so that item gets checked off the list.
Once home, we decided to test a new video camera by making a video. It's just Bill working on our boarding ladder steps so it will be of marginal interest, and that's being kind.
We shoot video as part of our business and recently had to upgrade our equipment to High Definition to satisfy the TV and cable stations. We sold our Sony ENG camera to a church in Berlin, Conn. and invested in a new and, it turns out, much more capable Sony HD camera. We just needed to test it and get some experience using it since it is very different from the last generation of Sony broadcast cams. Here it is set up in Whirlpool Studios or more accurately, in front of our washing machine.
Turned out that the color was very nice even under fluorescent light (that this camera adjusts for automatically) and Bill got to wear a wireless microphone just like the TV people do. Aside from his remarkably bad posture, everything worked just as it should. We'll edit it and insert it here just for the hell of it.
On Sunday, we had business deadlines to deal with so we worked most of the day.
Frances loves birds and as we've posted before, we found the perfect bird feeder. We set up a cam and photographed some of our local birds feeding on a cold, snowy afternoon. Turn up the sound so you can hear our background music.
We know. It isn't about boats, but we still like to watch the birds and have Frances identify each one.
This blog is about our experiences enjoying and maintaining our 1980 Silverton 34C powerboat.
Sunday, January 26, 2014
Tuesday, January 21, 2014
Taking a day off from boat plumbing
Before heading down to the boat on Saturday, we stopped at the Home Depot in Glastonbury, Conn. and found the place not very busy. We were steered to the plumbing department manager who turned out to be a nice guy. We asked a lot of questions about PEX but his answers were limited to the brand of PEX that Home Depot carries: SharkBite. Nice stuff, but the fittings are expensive and there are some downsides, it seems, to using SharkBite PEX in our boat application. At least they seem like downsides for us, who aren't plumbers by any means.
To make the visit even more informative, the plumbing guy at Home Depot asked us why we were even considering PEX when we could use ordinary marine water hose. Good question and one that we will consider before we go much farther with this project. We'll talk to Rob, our expert about this.
After Home Depot, we went to the boat and began to figure out how we were going to drag new hose (PEX or not) from the engine space, though a bulkhead into the area under the cabin sole and then into the galley.
Under the sink in the galley, we can't seem to reach the "T" that taps hot and cold water for the galley faucet. We removed the stove and that gave us a little more access. We stuck a camera at arms length back behind the galley sink and that showed an unopened box of spaghetti right in our field of view. Frances must have tossed it back there sometime last season or the season before and it landed beyond the shelf under the sink. We were just able to reach it and remove it after which another picture showed that the "T" fittings we need to access are underneath an air conditioning hose.
Bad photo, but you get he idea. We're going to have to pick up that AC hose (which we can't reach right now) to pull up the hot and cold water "T" fittings.
Next we opened the engine hatches and crawled down between the engines to make a sketch of the path that both the boat's cold water and the hot water take from the boat's water tank, the city water connection and the hot water heater.
Our "schematic" isn't very pretty, but it does show how the old water hoses are connected. It does omit one more connection and that is a "T" in the cold water line in the head that goes to the marine toilet, but that's all new and we aren't going to change it.
It was truly a day well spent.
To make the visit even more informative, the plumbing guy at Home Depot asked us why we were even considering PEX when we could use ordinary marine water hose. Good question and one that we will consider before we go much farther with this project. We'll talk to Rob, our expert about this.
After Home Depot, we went to the boat and began to figure out how we were going to drag new hose (PEX or not) from the engine space, though a bulkhead into the area under the cabin sole and then into the galley.
Under the sink in the galley, we can't seem to reach the "T" that taps hot and cold water for the galley faucet. We removed the stove and that gave us a little more access. We stuck a camera at arms length back behind the galley sink and that showed an unopened box of spaghetti right in our field of view. Frances must have tossed it back there sometime last season or the season before and it landed beyond the shelf under the sink. We were just able to reach it and remove it after which another picture showed that the "T" fittings we need to access are underneath an air conditioning hose.
Bad photo, but you get he idea. We're going to have to pick up that AC hose (which we can't reach right now) to pull up the hot and cold water "T" fittings.
Next we opened the engine hatches and crawled down between the engines to make a sketch of the path that both the boat's cold water and the hot water take from the boat's water tank, the city water connection and the hot water heater.
Our "schematic" isn't very pretty, but it does show how the old water hoses are connected. It does omit one more connection and that is a "T" in the cold water line in the head that goes to the marine toilet, but that's all new and we aren't going to change it.
Taking a day off
On Sunday, we spent the day at the New Britain Museum. We promised ourselves that this winter, with fewer boat projects, we'd take some time and do fun things.
The New Britain Museum is one of our favorites. We wanted to see the "Aloha" exhibit of Hawaiian art. It seems that the museum's first director, Sandy Lowe, was Hawaiian and his exuberant personality instilled lots of interest in Hawaii among the wealthy families of New Britain in the 1920s through the 1950s.
As a pleasant bonus, we also saw the extensive exhibit of Maurice Sendak's many drawings and children's books. We all remember "Where the Wild Things Are" but we learned that this was only one of the 63 books he wrote or illustrated.
On the way out, Frances adopted her "Wild Things" pose.
Sunday, January 12, 2014
Removing a leaky faucet
We have a couple of water-related goals here. First, install a new hot water heater, then replace all of the water lines from the water tank/city water inlet all the way forward to the galley with PEX hose and fittings. While we're screwing around with the plumbing, we want to replace the faucet in the galley, which leaks and for which there is no known fix.
If you're not asleep now, you will be soon because it gets even more complicated. To replace the faucet in the galley, we have to lift up the sink high enough to get at the hot and cold water connections and the faucet mounting nuts.
Or that's what we thought.
Once we got under there and removed the wing nuts and brackets that we thought held the sink it in place, we discovered that Silverton had also run a bead of adhesive around the edge of the sink. That sink is not going to come out on our watch or anyone else's unless the entire galley counter top comes out.
But, while we were inside that cabinet, we were able to access the heat exchanger on the AC unit. It was thoroughly clogged with crap. That will take some time to clean with our shop vac.
What we need for this is a basin wrench and we don't have one so on Sunday it's off to Home Depot to buy one.
We've added some video that you can skip. It's just Bill telling us that we were going to remove the faucet. He should probably just keep his day job.
After trying to get this faucet out for much too long, we finally had it. We must have dropped to the floor and reached into that cabinet 50 times and yes, we know, it's good exercise. The basin wrench was of no help but using a combination of other tools we finally got the hose adapters and the mounting nuts off.
One other notable thing from this weekend. Among Frances' Christmas gifts to Bill (and the boat) this year was this Kobalt flexible light. During the winter, we usually use those clamp-on reflector lights but rigging and positioning them is a pain in the butt. For this job under the sink, they wouldn't fit. Enter the Kobalt:
This thing is completely flexible so you can bend it in any direction or curl it up so it will stand up by itself. The light is a very bright LED and power comes from a rechargeable battery that screws into the end of the flexible arm. At the end of the day, you unscrew the battery and plug it in. We used it for about seven hours and the light was just as bright when we recharged it as it was when we first started using it. It even has a little light to tell you when its charged.
We love the name "Kobalt." Isn't that the stuff that sucked up all of Superman's powers? Ah, no, we have been corrected. That was "Kryptonite." Still like that name, though. How about, "Honey, why don't you have a cup of Kobalt before we go to bed?" Nope that doesn't work.
We could try, "I've just had my driveway resurfaced with Kobalt?" That sounds pretty manly. We think we're on to something.
Another great reason to share on a blog
Luckily, we didn't buy any PEX hose or fittings to replace the old water lines because our friends and dockmates Rob and Carol Ann left us a message on last week's blog post letting us know that domestic and marine PEX fittings and hose are different inside and outside diameters. That saved us some money! We think that we'd better talk to Rob about this before we buy anything. He has a lot of experience with both household and marine plumbing (and a lot of other things).Before we left on Saturday, we shot some video of the Connecticut River. A few days ago, it was frozen to four or five inches and the Coast Guard cutter Bollard came through to break a path. On Saturday, when we shot this, it was almost 50 degrees and the melting ice had clogged up right in front of the marina. It was also pouring rain.
Sunday, January 5, 2014
PEX
No opportunity to get back on the boat this weekend. We had some snow (not a lot) but with that snow came some very low temperatures. Just not a good time to be crawling around in the bilge.
We did do some research on the new water heater plumbing. Specifically, we asked others on the Silverton Owner's Club website who had done this sort of thing and we got several recommendations for using PEX tubing and fittings. We thought that PEX was a brand name, but it isn't. It's a type of flexible tubing and fittings that are now very commonly used in both housing and boat construction.
Then we watched several of the dozens of videos on YouTube to find out how PEX works. Looks like just what we need. PEX-A blue for cold and red for hot water. Seems we have to separate the PEX tubing from the water heater by about 18 inches using a copper line, but that should be relatively easy. Apparently, we'll also need a check valve at the cold water inlet of the water heater.
We're not sure why we keep using the term "relatively easy." Nothing on these old boats ever comes close to being easy. We think we can pull new PEX hot and cold water lines into the area under the galley sink. Once there, we have to disconnect the old hoses and connect the new PEX lines. To do that, we'll have to disconnect the sink and tip it up to get access the faucet connections. Right now, we can't reach that far under the galley to reach the clips that hold the sink in place. We're going to need really long arms to pull this off.
But, it's just boating. We'll find a way.
We did do some research on the new water heater plumbing. Specifically, we asked others on the Silverton Owner's Club website who had done this sort of thing and we got several recommendations for using PEX tubing and fittings. We thought that PEX was a brand name, but it isn't. It's a type of flexible tubing and fittings that are now very commonly used in both housing and boat construction.
Then we watched several of the dozens of videos on YouTube to find out how PEX works. Looks like just what we need. PEX-A blue for cold and red for hot water. Seems we have to separate the PEX tubing from the water heater by about 18 inches using a copper line, but that should be relatively easy. Apparently, we'll also need a check valve at the cold water inlet of the water heater.
We're not sure why we keep using the term "relatively easy." Nothing on these old boats ever comes close to being easy. We think we can pull new PEX hot and cold water lines into the area under the galley sink. Once there, we have to disconnect the old hoses and connect the new PEX lines. To do that, we'll have to disconnect the sink and tip it up to get access the faucet connections. Right now, we can't reach that far under the galley to reach the clips that hold the sink in place. We're going to need really long arms to pull this off.
But, it's just boating. We'll find a way.
Sunday, December 29, 2013
Back to the list of winter projects
We started off this weekend by mounting the newly refinished teak strips on the anchor pulpit. Before doing that, we scraped off the last of the crud and stains that had accumulated on the pulpit and then waxed it.
Time to get to some more serious stuff. We need to replace our 6 gallon electric water heater. It seems that sometime over the years before we owned this boat, someone put some diesel fuel or gasoline in the water tank. Frances spent a lot of time over the last few summers flushing the system and while the cold water is now fine, the hot water side still has that slight diesel smell. Since we've flushed out everything else, the only part left is the water heater.
We crawled down beside the port engine to get some measurements. The old Raritan water heater is circular, 15 inches across and 15-3/4 inches high. It's screwed down to a plywood base that appears to be in pretty good condition. As you can see from the pics, the plumbing is a mess, as you might expect from a 33 year old boat.
Our plan is to remove all of the old 1/2-inch water hose and replace it with PVC. We'll have to make some connections, such as the accumulator tank, fresh water pump and faucets in the galley and head with 1/2-inch water hose. If there are no transition fittings from 1/2-inch PVC to 1/2-inch marine water hose, we'll use all hose. Since most of this plumbing is under the salon floor, we think we can pull new hose (or PVC) in using the old hoses as pilot lines. That worked when we installed a new waste pump-out line.
Removing the hot water tank
Sunday was dark and rainy but that old hot water tank definitely wasn't going to jump out of the boat by itself, so down we went to remove it.
The hose clamps on the cold water supply and the hot water hoses disintegrated when we tried to loosen them. That's fine; all of this stuff is going to be replaced. We cut the hoses with a utility knife and drained the tank into the bilge.
To get the last of the antifreeze solution out, we had to tip the tank almost on its side and to get clearance to do that, we had to remove the coolant recovery bottle on the back of the port engine and the bilge blower. As the last of the liquid drained, we saw that Frances "oil in the water heater" theory was correct. Thick gobs of smelly black goo slithered into the bilge. The whole engine space smelled like diesel fuel.
Once the tank was empty, we turned it around, took off the access plate and cut the AC power wires. Then we wrestled it out behind the port engine. Apparently, we dislodged more diesel scum as we moved the tank.
We keep some clean shop rags on the boat and we used those to sop up the mess. Once it has dried a little, we'll attack that area with our Shop Vac. We'll also replace all those dirty old passive vent hoses. And maybe a new bilge blower, too. Hell, it's only money.
It looked a little better after we cleaned up most of the water and oil.
The AC wiring for the water heater was quite a mess. Whoever maintained this boat for the previous owner loved butt splices. There are probably half a dozen in that rat's nest of wiring hanging down. We'll cut all of those out and rewire the whole thing properly.
It would be nice to be able to get back in there so we could do some real cleaning and wiring. However, that means crawling over or lying on the top of the port V-drive, which you can see at the bottom of the photo. We're thinking of building a platform out of scrap plywood that would rest the stringers or down into the bilge to protect us from the V-drive and give us a semi-comfortable place to lie as we worked in that corner.
Like all boat projects, each one gets bigger as you delve into it. But, as we've said in previous posts, we just can't do anything half-way.
As we left on Sunday afternoon, the Bad Boy was on the deck, waiting for better weather before we drag it over to the Dumpster.
Wednesday, December 25, 2013
Polar Navy
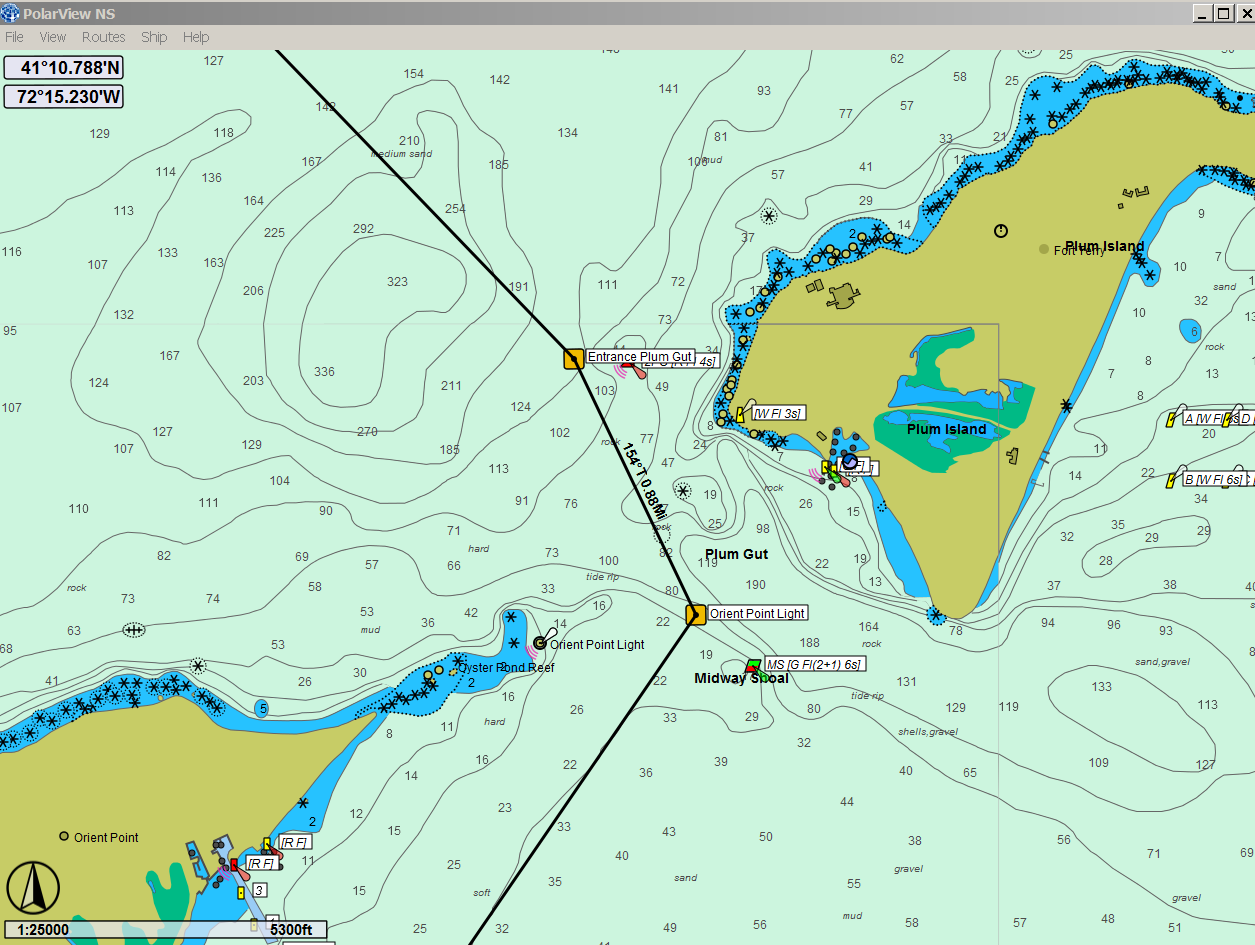
Sometimes on a cold winter afternoon, it's fun to plan a cruise or, as we have done here, set up a route that we can use on our Netbook computer when we're underway.
The navigation software that we've been using for the past couple of years is made by Polar Navy and it comes in two pieces: PolarView (the chart application shown here) and PolarCom, which is a simulated set of navigation instruments that can be set up to show Heading, Speed Over Ground, Distance Covered, etc. In fact, you can set PolarCom up to display virtually any information you have available in NMEA 0183 (or NMEA 2000, I believe) format.
Here's the PolarCom application running over PolarView. Here at home, we don't have any GPS input so it's showing the default, Current Position, Speed over Ground and Course, all of which are zero. The default instrument size is somewhat big, but you can make it smaller and move it around, out of the way, on the chart by just dragging it.
PolarView costs just $39.95 and PolarCom comes with it for free. That purchase gives you a license to download any of the ENC or Raster charts whenever you want to. You also get three seats, so that you can load it onto a home PC and perhaps a laptop, as we have done.
If you create a route for an upcoming cruise at home, PolarView makes it easy to export that data (via an Excel .csv file) to a flash drive and then later, import the data onto your boat computer.
PolarView is also integrated with Active Captain data so you can click on an Active Captain point-of-interest and read what other Active Captain members have said about it.
You can name the routes and the individual waypoints and waypoints can be shared between routes. Once a route leg is established, PolarView shows you its distance and relative bearing to the next waypoint, which is really useful.
We use our little Acer Netbook and a small puck-type GPS receiver while underway. Our boat's position is shown on the chart at any scale we choose, making it easy to follow a particular planned route without leaving a snake-wake in the ocean behind us.
Sure, all of this can be done with multi-function navigation displays but they cost a lot more than we're willing to invest. We use a Standard Horizon chartplotter that gets its GPS info from an external antenna and sends waypoint data to our old reliable Furuno radar, but the PolarView chart display on our computer is so much easier to read and from what we can see, the GPS position is also more accurate.
It is also really tedious to plan a route on the Standard Horizon plotter with its little joystick. Now we plan the route using PolarView and then just key in the coordinates of the waypoints in on the chartplotter.
The first screen-grab photo above shows Plum Gut, one of of favorite 0.88 miles of water. We've probably been through there 200 times and we don't really need those waypoints but, there were those times when the fog was so heavy that...
But we all have our fog stories so we won't bore you with ours.
Sunday, December 22, 2013
Anchor roller project over
It seems we've been fooling with the new anchor and anchor roller forever, but on Saturday, with the temperature at 57 degrees, we finally got the roller roller mounted. We used the roller itself as a template and drilled the three 3/8-inch holes in the pulpit. We also plugged the old holes to protect the core in the pulpit. We used three 3/8-inch x 2-inch stainless bolts, nuts and fender washers. You could dance on the damn thing now.
We ended up mounting the roller much further forward than we originally thought. In a previous chapter of this blog, we showed how we experimented with the mounting position. Farther back, the new hinged plow anchor looked like it just might whack the hull on the way up so we went out as far as we could.
Today we drove off to the boatyard with everything we needed except the new anchor. We'll attach the anchor tomorrow and then run it up and down a few times to see how it works.
While we had a nice warm day, we crawled under the boat to check the props, rudders and zincs. No digs in the props and there are a couple of zincs that we won't have to change. Looks like we'll have to run a wire wheel over the rudders and props to get rid of the tiny little shellfish that we always seem to collect. The power washing takes most of them off but we do have lots of little white circles left. You can see them in the video we made today.
We also walked down to the river and saw it in a way that we rarely do. It was completely still, with lots of ice fragments. No tidal movement at all. We suspect that there was just enough snow melt to hold the tide steady. Just north of the marina, the river was still all ice but with a nice channel cut through it. We have to assume that the path through the ice was made by the Coast Guard Harbor Tug Bollard earlier in the week. The Bollard patrols the Connecticut River every winter to break ice and is always a welcome sight when the weather is really cold and the river is frozen over.
Here's some video. It's only two minutes but making videos helps us renew our video editing skills, some of which we haven't used in quite a while.
On Sunday, we mounted the new anchor on the anchor line and pulled it up. We noticed that if we ran the anchor up until it wouldn't go any farther (actually, when the eye on the end of the anchor line hits the mouth of the windlass), the anchor would jam at the roller just behind the anchor hinge. To get it to release, we had to give it a shove and we obviously can't do that when we are trying to anchor. We needed to shorten the chain slightly.
To do that we lowered the anchor back down and removed two extra shackles that for some reason had been added to either ends of the chain over the years. That made the chain about two inches shorter. The anchor then dropped fairly predictably but to make it exact, we'll have to remove one link of chain. We didn't have tools with us to cut the chain today, but we'll put that on the list and fine tune the chain length over the next few weeks.
Merry Christmas, everyone.
Subscribe to:
Posts (Atom)

.jpg)