We just ordered about $500 worth of manifolds and gaskets for our cylinder head replacement project. Obviously, we shopped around for price and availability and settled on Lighthouse Marine in Riverhead, New York http://www.marineengineparts.com/
We did that for several reasons. First, this is a real, second generation business with a warehouse full of marine parts. We've been there and liked the way we were treated. Second, the guys behind the counter know what they are talking about and those same guys are the ones you get when you order parts by phone. Finally, what's not to like about an Internet marine supplier that also owns a very nice marina? It's right down the street from their store.
We ordered today using the Internet because we had all of the part numbers ready. Since Lighthouse is on Long Island, we'll get the parts tomorrow and the shipping cost was $20, pretty reasonable given that the manifold we ordered weighs about 35 lbs. alone.
I received an acknowledgement from Greg, the company's business manager, within 5 minutes. A few minutes later, Greg called me. He was concerned about the head gaskets that I had ordered. Was I sure that I wanted these Chrysler NOS head gaskets? I said that I thought I did, given the description.
We discussed the possible differences in what he had and what I needed. Since by then, I was at his website, he gave me another part number, a Fel-Pro head gasket set and I looked at it. I pointed out that the application for that Fel-Pro gasket set was for 7.4 liter Ford engine and not for my engine, a Chrysler LM-360.
There was a short silence after which he said, "Our description is wrong. This Fel-Pro gasket set is for a Chrysler LM-360." He went on to say that the Fel-Pro gaskets were the "gold standard" in gaskets and they had never had any problems with their customers using them.
The Fel-Pro gaskets cost a little more so we revised the order to cover that.
Our point here is that this is the way buying marine parts on the Internet should work, but rarely does. It would have been easier for Lighthouse to send us the wrong gaskets and then play around with us getting an RMA to send them back.
But they didn't. They examined our order, found a problem and called us to resolve it. That's what happens when your supplier knows boats and values the relationship.
Wednesday, December 10, 2014


Monday, December 8, 2014
Installing new cylinder heads - Progress on a cold weekend
We're glad that we don't do this for a living because if we did, we'd starve. We know that people do jobs like this every day but we have to re-learn a lot, given that we haven't changed marine cylinder heads in about 10 years and even then, they were familiar GM V-8 engines. This time, it's a Chrysler 360 V-8 and there are some differences.
When we left last week, we had the outboard starboard exhaust manifold up against the water tank and hanging from two studs.

We decided to think about how to remove it and during the week came up with a nautical solution that worked perfectly. It involved putting a dock line through the manifold and then suspending it from a crossbar. That took the pressure off the those two remaining studs. The result was that we got that outboard manifold off. Then we could move this project along a little.
It took another hour to remove the two valve covers. These things might have been on there for 30 or more years and it took some patience to finally get them off. They looked good inside, however. No sludge, so we'll clean them up and reinstall them when we finally get the new heads installed.
The intake manifold bolts (all 12 of them) came out but if we hadn't had the offset box wrenches that we bought at Harbor Freight, we 'd still be down there trying to do it with straight box wrenches. The angle of the bolts was really hard to reach and using sockets was out of the question.

With the bolts out, we tried to get the manifold off but it wouldn't budge. By then, we were cold and tired and we've learned in the past that it's sometimes better to quit and try again another day.
It's amazing what a good night's sleep will do because when we arrived on Sunday, we used a small crowbar to tap around the edges of the manifold. It began to move a little and we were able to lift it right off the engine.

We took the carb off (should have done that first) and put the manifold in the car so we could take it home and scrape the old gasket material off and clean it up a little.
Since we were on a roll, next we removed the rocker arm assembly and the pushrods from the inboard side of the engine. We laid all of those parts out by the numbers because they are supposed to go back into their original positions.
After we get the inboard head off, our plan was to begin on the other head but now think that's not the best way to do it. It appears that a better way is to replace the head on in inboard side and reinstall the rocker arms, pushrods and valve cover as well. That will keep debris out of that side of the engine and give us some practice before we begin the outboard head. That outboard side is up against the water tank and will be much more difficult to do. We'll approach that one knowing exactly what wrench to use and that will be helpful since getting that head off is going to require doing things at least partially by touch and feel.
Here's some of what it looked like this weekend.
When we left last week, we had the outboard starboard exhaust manifold up against the water tank and hanging from two studs.
We decided to think about how to remove it and during the week came up with a nautical solution that worked perfectly. It involved putting a dock line through the manifold and then suspending it from a crossbar. That took the pressure off the those two remaining studs. The result was that we got that outboard manifold off. Then we could move this project along a little.
It took another hour to remove the two valve covers. These things might have been on there for 30 or more years and it took some patience to finally get them off. They looked good inside, however. No sludge, so we'll clean them up and reinstall them when we finally get the new heads installed.
The intake manifold bolts (all 12 of them) came out but if we hadn't had the offset box wrenches that we bought at Harbor Freight, we 'd still be down there trying to do it with straight box wrenches. The angle of the bolts was really hard to reach and using sockets was out of the question.
With the bolts out, we tried to get the manifold off but it wouldn't budge. By then, we were cold and tired and we've learned in the past that it's sometimes better to quit and try again another day.
It's amazing what a good night's sleep will do because when we arrived on Sunday, we used a small crowbar to tap around the edges of the manifold. It began to move a little and we were able to lift it right off the engine.
We took the carb off (should have done that first) and put the manifold in the car so we could take it home and scrape the old gasket material off and clean it up a little.
Since we were on a roll, next we removed the rocker arm assembly and the pushrods from the inboard side of the engine. We laid all of those parts out by the numbers because they are supposed to go back into their original positions.
After we get the inboard head off, our plan was to begin on the other head but now think that's not the best way to do it. It appears that a better way is to replace the head on in inboard side and reinstall the rocker arms, pushrods and valve cover as well. That will keep debris out of that side of the engine and give us some practice before we begin the outboard head. That outboard side is up against the water tank and will be much more difficult to do. We'll approach that one knowing exactly what wrench to use and that will be helpful since getting that head off is going to require doing things at least partially by touch and feel.
Here's some of what it looked like this weekend.
Monday, December 1, 2014
Installing new cylinder heads - Exhaust manifold removal first

After enjoying a great Thanksgiving and working the next day, on Saturday we were ready to tackle the removal of the inboard starboard exhaust manifold. Last weekend, we started on this but managed to round over one of the six bolts that hold the manifold to the cylinder head and we didn't have the required Allen key to remove the adapter from the top of the manifold. Hey, it was the first day of a new project and it took us a while to get everything on the boat we needed.
Saturday, we were better prepared. During the week, we visited Harbor Freight and bought an inexpensive set of 3/8-drive, six-point sockets. We own hundreds of sockets but not many of the six point deep well variety.
Once on the boat with all of the lights hooked up, we tried the manifold bolt with the rounded head and the six-point socket backed it out immediately. We had to disconnect a couple of water lines and the manifold was ready to come loose.
Chrysler marine exhaust manifolds have three mounting points (unlike GM small block V-8 manifolds that have four). Chrysler also uses studs on the forward and aft-most manifold mounting points and three-inch long bolts on the four others. That makes sense because you can remove the bolts and then the nuts on the two studs and then pull the manifold off, sliding it on the studs.
One tug and the manifold came loose and we slid it out and off. From its outward appearance, the manifold didn't look bad. In fact it looked very good. We shined a light down into the ports and there was absolutely no rust. In fact, except for some carbon, it looked almost new.
We have no idea when these manifolds were last changed but from the look of two mismatched washers on the mounting bolts, these manifolds weren't original. Our engines are cooled in such a way that only a 50-50 percent mixture of antifreeze and water ever passes through the manifolds. Seawater is used to cool the heat exchangers and the exhaust elbows. That means that they should last a long time.
If the other manifold looks this good (and we bet it will), we'll save about $630 by reusing them.
The match between the manifold and the exhaust elbow is made through an adapter. It uses a block-off gasket to keep seawater out of the manifold.

We've brought this adapter home and will clean it thoroughly and re-use it.
Ugh! on Sunday
On Sunday, it was 45 degrees, plenty warm enough to get that other riser and manifold off. Having done the inboard manifold and riser on the inboard side just yesterday, the outboard manifold went pretty quickly until we ran into a major snag.
After disconnecting the water hoses, we easily removed the riser. With that gone, we tested the studs on the ends of the exhaust manifold to make sure that the studs didn't unscrew when we removed the nuts. They didn't, so we took out the other four manifold bolts. Getting a wrench in there so close to the water tank took a little stretching but they did come out. You can see how close the water tank is in this picture.

Next, we slid the manifold out away from the cylinder head but before it was free, it came in contact with the fiberglass fresh water tank. We tried moving the tank, but it's up against the hull so it isn't going anywhere.
We didn't notice this until we looked at these pictures while writing this blog post, but that manifold appears to be cracked. We can't wait to look at this in more detail when be get the damn thing out but whatever we find, that manifold is going to the Dumpster.
Here's what it looked like when we left on Sunday afternoon... one manifold hanging from two 3/8" studs. Looks like we'll have to cut them off.

We would liked to have been able to get that manifold off so we can begin removing the intake manifold but looks like we'll have to stop and deal with this first. But, it's a boat, so nothing goes exactly as planned.
Monday, November 24, 2014
Replacing the cylinder heads - Beginning

Thus fortified, we made our way to the boat. The idea was to give Frances a chance to take some last items off the boat for the winter.

While she did that, I took a look at what I'd have to do to replace the heads on our starboard engine.

Several years ago, we replaced the all four risers and had the heat exchangers rebuilt, so this wasn't new territory for us. We didn't really have all of the tools required but while Frances was busy, we took a look at removing the inside starboard manifold, since that was the easiest one to access.
As you'll see in the video, the riser on that side came off without much effort. The bolts on the manifold also came out, except for one, where we rounded the head of the bolt. We can get that out but we didn't have the tools necessary right then. The other bolts holding the manifold in were in quite good condition so we have to think that the manifolds had been replaced before with good quality hardware. That's good because we don't want to break off a bolt.
Next weekend, we'll take everything off that side and all the other stuff we're going to have to remove. At least that's what we'll try to do.
Sunday, November 16, 2014
The last of the pink stuff

Saturday morning saw us back on the boat with a few more gallons of pink antifreeze. Nothing like seeing this stuff disappearing into our fresh water tank only to be pumped out in the spring.

But it's better than freezing and damaging all that new plumbing we installed last winter. We think we under estimated the capacity of our water system's new hot water heater. We drained it and then refilled it with antifreeze. With our new pump (see our last blog post concerning what we think of that thing), we got lots of antifreeze in the sink in the head as soon as we turned the pump on.

Then, the final test. Unless we have a serious urinary condition, this is a winterized toilet.

Thank God that's over!
On Sunday, we had planned to begin work on our starboard engine but the leaves, of which we have many, caught our attention and we raked the yard and cleaned out the gutters. Not as good as wrenching on our boat, but something that just has to be done.

Meanwhile, Frances was busy making an apple pie and she certainly can bake! Some time this winter, we hope to create a video on how she does it. Rehearsals are already under way and she is looking forward to it.
Wednesday, November 12, 2014
This kind of workmanship drives people away from boating
We just finished installing a new fresh water pump. Why do that at the beginning of winter? Well, when we went to pump potable antifreeze from our on-board water tank through the lines to the galley and head, our five year old ShurFlow Extreme Series pump wouldn't pump. No suction at all although the motor ran fine.
We know what you're thinking: It lasted five years. Sorry, but it didn't. Two years after we installed it, the diaphragm failed and we took it apart and replaced the old diaphragm assembly. That pump cost over $200 new and the rebuild parts were well over $100.
And, we're not running a charter boat here with a bunch of guys flushing their way through 45 gallons of fresh water, five or six days a week. During the summer, we're at a marina, drinking and washing in city water. We only use that pump when we are underway and that's not what we'd call extreme usage at all.
Cold weather is predicted here which means we should pump the pink stuff through our water lines sooner rather than later. We ordered a new pump from Defender Marine and because we don't have time to re-plumb the system to accept a completely different pump, we ordered a ShurFlow Par-Max Plus pump, which is very close in appearance and performance to the extremely failed old pump.

How long will the ShurFlow Par-Max Plus pump last? Judging from the price, probably not as long as good old Extreme. Par Max Plus cost $132 (plus $11.15 shipping and $9.15 tax) and that's a lot less than the old Extreme pump was.
Here's the old pump. Not only doesn't it pump, but it's rusty even after being in an area that is relatively dry. We're not sure that any of the pumps from competing manufacturers are any better, but if you are in the market for a pressure water pump, avoid ShurFlow or look forward to an hour in the engine space to replace it fairly regularly.


We know what you're thinking: It lasted five years. Sorry, but it didn't. Two years after we installed it, the diaphragm failed and we took it apart and replaced the old diaphragm assembly. That pump cost over $200 new and the rebuild parts were well over $100.
And, we're not running a charter boat here with a bunch of guys flushing their way through 45 gallons of fresh water, five or six days a week. During the summer, we're at a marina, drinking and washing in city water. We only use that pump when we are underway and that's not what we'd call extreme usage at all.
Cold weather is predicted here which means we should pump the pink stuff through our water lines sooner rather than later. We ordered a new pump from Defender Marine and because we don't have time to re-plumb the system to accept a completely different pump, we ordered a ShurFlow Par-Max Plus pump, which is very close in appearance and performance to the extremely failed old pump.

How long will the ShurFlow Par-Max Plus pump last? Judging from the price, probably not as long as good old Extreme. Par Max Plus cost $132 (plus $11.15 shipping and $9.15 tax) and that's a lot less than the old Extreme pump was.
Here's the old pump. Not only doesn't it pump, but it's rusty even after being in an area that is relatively dry. We're not sure that any of the pumps from competing manufacturers are any better, but if you are in the market for a pressure water pump, avoid ShurFlow or look forward to an hour in the engine space to replace it fairly regularly.

What happened to reliable equipment?
Here's another example of poor workmanship that we, unfortunately, own. It's our Standard Horizon Chart plotter.
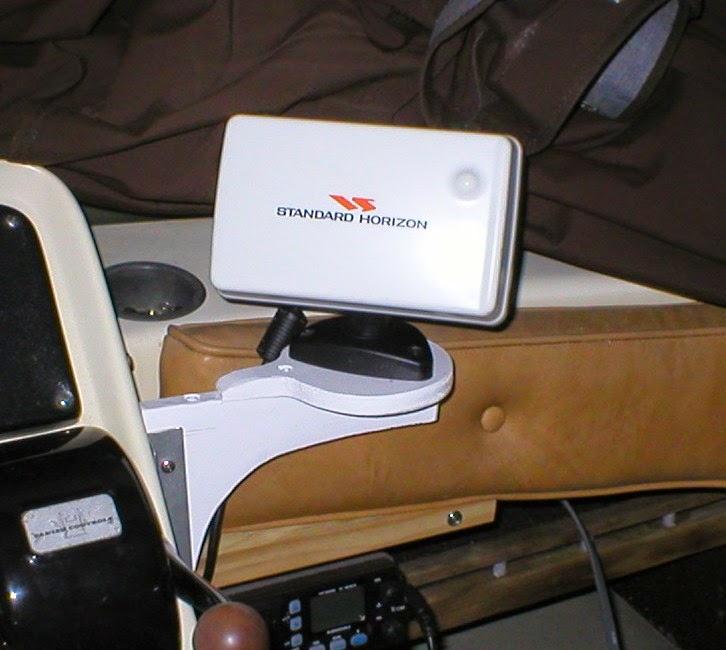
This picture was taken when it was new, five years ago. Since then, the plastic cover has deformed, yellowed and no longer fits. But better yet, the unit itself is no longer reliable. When we set it to record miles traveled on a cruise, the result shown is roughly double the distance we have actually covered. On a recent cruise, our location was shown to be in the middle of a Connecticut state park when we were actually in the channel on the Connecticut River. Gee, just a mile or two off.
The Standard Horizon Chart plotter also came with an instruction manual that is beyond bad. Whoever wrote it has never been on a boat trying to figure out what button to push to simply display a route. That should be easy. The small computer we use to really navigate does that in a split second and it displays exactly where we are and how much distance we have traveled. It cost lot less than the Standard Horizon unit and it's now four years old.
We won't belabor this but looking at the chart plotter photo reminds us that the people who designed our Icom M-412 VHF marine radio also have never spent any time on a boat. The mic cord for this radio maxes out at maybe 35 inches. That means that we can't stand up while operating the radio. In fact, you have to bend over to use the mic while seated at the helm. Guess we should relocate our helm chair, right?
Sorry to spend your time on this rant. There are many other things we could complain about in the recreational boating world but this is probably enough for now.
Saturday, November 8, 2014
Winterizing our engines

We winterized on Tuesday, November 4 during a very nice afternoon. Obviously, we only do this once a year and despite the fact that we've been doing it to our various boats' engines for perhaps 35 years, it is always a little sloppier than we remembered. Lots of hot oil, full oil filters and many jugs of oil and antifreeze to be poured or pumped. We wear plastic gloves but never attempt this task wearing any clothes that would be acceptable outside of a boat yard. The old hoodie that Bill wore on Tuesday has the stains of many colors of bottom paint going back 12-15 years.
Changing the oil
The sloppiest part of this job is always changing the oil filters and that's where we begin. First, we start the engines and warm them to thin out the engine oil and make it easier to pump out of the crankcases. Then we remove the oil engine oil filters. Some time ago, we moved the filters from the engines themselves (where they were almost impossible to reach) to remote mounts in front of the engines. (Our engines are on v-drives, so the engines face aft.)


Putting the new filter on is pretty straightforward but it has to be filled with fresh engine oil first. A filter like this Fram PH8A takes about a quart. The whole oil change is supposed to total five quarts on our engines but another one-half quart is needed to also fill the remote oil filter lines, which are about three feet long each. Note the old filter in its baggie. Zip-lock bags are great for containing that crappy old oil.
Next we suck out the old oil from the crankcases.

We use a Marpac Fluid Xtractor. I think we've owned at least three or four oil pumps, both electric and vacuum, over the years but this one, now five years old, is the only one that really works. Give the handle a dozen or so pumps and it starts pulling the old oil up through the dipstick tube almost immediately. It holds 4.2 quarts and it does need to be pumped again a couple of times to get the last of the old oil out.
Once both engines have been filled with fresh oil, we start them up, watch the oil pressure build and check for leaks.
Winterizing the cooling system
Over the years, we've assembled some tools for this task. One is an old six gallon bucket that once held some industrial flavoring. We cut a hole in the bottom and added a valve and then a long section of hose. This thing has winterized our boats for many years. Yes, it leaks a little, but for the few minutes it's in use, who cares? It all goes into the bilge.
Then we go to the thru-hull fitting that feeds seawater to the boat's heat exchangers. Here, we've added a simple t-fitting that will allow the engine to draw antifreeze from our bucket, after we have closed the sea cock.

Fill the bucket with three gallons of antifreeze, open the valve and start the engine and about 45 seconds later, pink antifreeze is flowing out the exhaust and the bucket is empty.
It's probably worth mentioning that our engines are "fresh water" cooled, meaning that the cooling of the engine block itself and part of the exhaust manifolds is done through a heat exchanger that is actually filled with a 50-50% mixture of ethylene glycol (green) antifreeze and water. The pink antifreeze that we're using here only protects the seawater circuits in the heat exchanger and exhaust manifolds. That's why we can do it with just three gallons of pink antifreeze.
We've seen lots of discussion of this pink stuff on Internet forums. We shop for the best price and this year paid $3 a gallon at Tractor Supply. We've used this antifreeze through a number of very cold winters here (-20 degrees F at times) and have never had a freezing issue.
We ran out of time before we could winterize the boat's hot and cold water systems but we'll do that next weekend.
We've added a video showing some of this process. At this point, it clearly shows that Bill needed a haircut. Other than that, it was fun to do and to play narrator.
Subscribe to:
Posts (Atom)