Monday, April 11, 2016

Refreshing the V-berths

Since we've completed making the two guest berths more presentable, we continued with our plan to do the same to the two v-berths, where Frances and I sleep.  Nothing fancy here, just refinishing the wood trim and covering the old, dull, wall covering with a nicer and brighter new color.

Taping the wood trim is a lot of fun if you are into torture, but by squirming around into a lot of odd positions, we got it done. Applying the Sikkens varnish takes just about 15 minutes. Making sure that it is done right by masking properly took us more than two hours per side.

Frances arrived while we were prepping the surfaces and her help taping was much appreciated. As it was, we spent all of Saturday and Sunday afternoons on this project and looks like we'll spend a couple of more afternoons to make it the way we want it.


This is the port side V-berth looking aft just after we finished scrubbing everything with Dirtex. Those dark marks on the wall next to the reading light wouldn't come off no matter how hard we scrubbed. By the end of the day, they had disappeared behind new paint.


This shot shows the wall above the port V-berth after the removal of a bookcase that had been mounted there. Someone in the past tried to varnish that bookcase without removing it first. Sloppy and lazy. The bookcase is now on our workbench at home where it will be cleaned and refinished properly.

It is rewarding to look back on this project as it nears completion and see how much more inviting the inside of the boat looks. One or two more weekends and we'll be ready to clean up the hull, refresh the boot-top stripe and put on a few new zincs. Then it's back into the water.

A few weeks ago we bought a knock-off of the Go-Pro camera. Yes, we know, we have more than enough cameras but we thought it would be fun to experiment with a body-cam. Even the cheapest Go-Pro cameras cost a couple of hundred dollars but we (and a lot of other people) found one that looks and works almost exactly like the real thing for, in our case, just $38.00.

Our body cam shown with a standard household duplex outlet cover for size comparison. The cam itself is inside a plastic waterproof housing.

 These aren't exactly precision instruments and have very few exposure adjustments but the video they produce has that crazy fish-eye look that you get from a lens with a 170 degree field of view. Go-Pro body cam videos are all over You Tube and are meant, it seems, to be used outdoors. There is no way to set the color temperature so the shot you'll see at the beginning of our video looks very red because it was shot under several CFL indoor bulbs. We sped it up so it hopefully wouldn't be too boring.


Sunday, April 3, 2016

Guest Berth Rehab Complete

This project took longer than we thought it would but the effort we put into it really paid off.


Note in this photo that the bottom bunk is exactly the same material and color as the top bunk but our little point-and-shoot camera just couldn't capture that. As shown, it looks like an old army blanket but it's actually the same as the top, nice and new looking.

Anyway, the mahogany trim looks like new after a good cleaning and a single coat of Sikken Cetol Marine Light. The wall covering on the walls also looks much brighter and cleaner and is now free from any old dings and small tears


The bunks themselves are hollow, somewhat like some residential doors, and after light sanding took the new paint very evenly.

While the weather this weekend is terrible (Long Island Sound East forecast for this afternoon was wind 20-30 Kts, gusting to 50 Kts with seas 5 to 7 feet.) spring is coming soon and we're putting the boat on the launch list for early May. That gives us about a month the finish the v-berth rehab, do a touch-up on our bottom paint, replace the zincs on the shafts and waterproof the bridge enclosure.  We'll clean and wax the cockpit and cabin sides when we get to Norwich for the summer.

Next it's on the the v-berth. We've started cleaning the mahogany trim and next weekend, we'll mask off the trim and apply Sikkens to it. We may also be able to begin some painting of the wall covering. We learned a few tricks to save time during the guest berth project.

We shot some video of working on the guest berth this weekend, mainly so Bill can continue to improve on his rusty editing skills. It's tough being the talent, the video guy and the sound guy all at once,  but it's fun for us to look back on these videos later and usually laugh.


Sunday, March 27, 2016

Painting the guest berth


That wall in our guest berth looked pretty shabby. That's not surprising given that the wall covering is 36 years old and the mahogany trim has probably never been refinished. We've done all the prep work over the last few weeks so this weekend it was time to apply some paint and varnish.

We masked off most of the trim last weekend and on Saturday be began by masking all the spots that we missed and there were quite a few of them. What we are calling "trim" just may be mahogany and we used Sikkens Marine Light on every piece. It was rewarding to see the wood take on new color and smoother surface.

As we think we mentioned before, we didn't sand the interior wood trim but instead scrubbed it with Dirtex. It was amazing how much dirt came off and from the way it looks now, after applying the Sikkens, not sanding was a good idea.

After applying the Sikkens to the trim, we were left with some time on our hands. It was much to early to go home so we broke out the interior paint and applied a first coat on the large wall areas were we could, without disturbing the masked off and still tacky wood trim.

The color we are using on the walls was originally designed by Frances who used it when she reconditioned all of the doors on the boat when we first bought it. We used that color again last summer when we refreshed the galley and head walls and they came out fine.

We had about half a quart left from last summer and that was enough to give the guest berth walls a good first coat. We used a three-inch roller and a one-inch brush.

One the way home, stopped at a Sherwin Williams store to buy more paint. Unfortunately, we had obliterated the paint formula on the side of the can but that didn't turn out to be much of a problem. The person at Sherwin Williams asked where we had purchased the last quart of paint. We told her that it was in Norwich. She called the Norwich store, got the paint formula from them and was able to duplicate it in just a few minutes.

We're glad we are in the Sherwin Williams national database and from now on, Frances' color is called "Boat Peach Large."

Here's a before-and-after of what the aft wall looked like


The color doesn't show up very well in incandescent light but it makes this whole area so much brighter and cleaner looking.

On Sunday, we got a few more surfaces painted but avoided the mahogany trim, which was still a little tacky.

Our plan is to finish the guest berth area next weekend and then see if we can refurbish the v-berths before it's time to go back in the water.

We shot some video but we're getting tired of seeing Bill in most of them. Next weekend the Master Planner, Frances, will be asked to appear.  Since spring is coming, it's about time we see her smiling face.


Sunday, March 20, 2016

Wiring up the guest berth


We think we previously explained that we wanted to hide all the wiring in the guest berth before we painted all of the walls and re-varnished the trim. When we left last weekend, it was obvious that we're going to need a lot of stuff, some of which we had and some we had to buy.

We began by making a list and that list got bigger as the week went on. It turned out that we had a couple of short sections of that plastic raceway but we need a "T" to hide the wires on the forward wall. We found that at Home Depot.

Speaking of Home Depot, Frances was concerned that we wouldn't position the reading light on the forward wall in exactly the right place. With that in mind, we took a few hours off from work and went to the boat together. Frances marked the spot with a piece of tape.

You know it will be mounted exactly here.


Needless to say, by Saturday morning, we had all of what we thought was required and we went to the boat. It was a nice day but we had little time to chat. Time to get to work.

We tackled the aft wall of the guest berth first. We tried to fill the holes and the places where the old wall covering had been ripped but our spackling compound was too cold. We left it bake to in the car for a while and then we were able to fill all the old voids.

The idea was to cover the power and cable TV wires to the TV and still leave enough slack so that the TV could still swing around to be seen from the cabin.

After a few tries, that worked out fine and it should look great when everything is painted.

We also rewired the place where the lower guest berth light will go. As it was, it worked only when the cabin lights were on. Now it works independently.


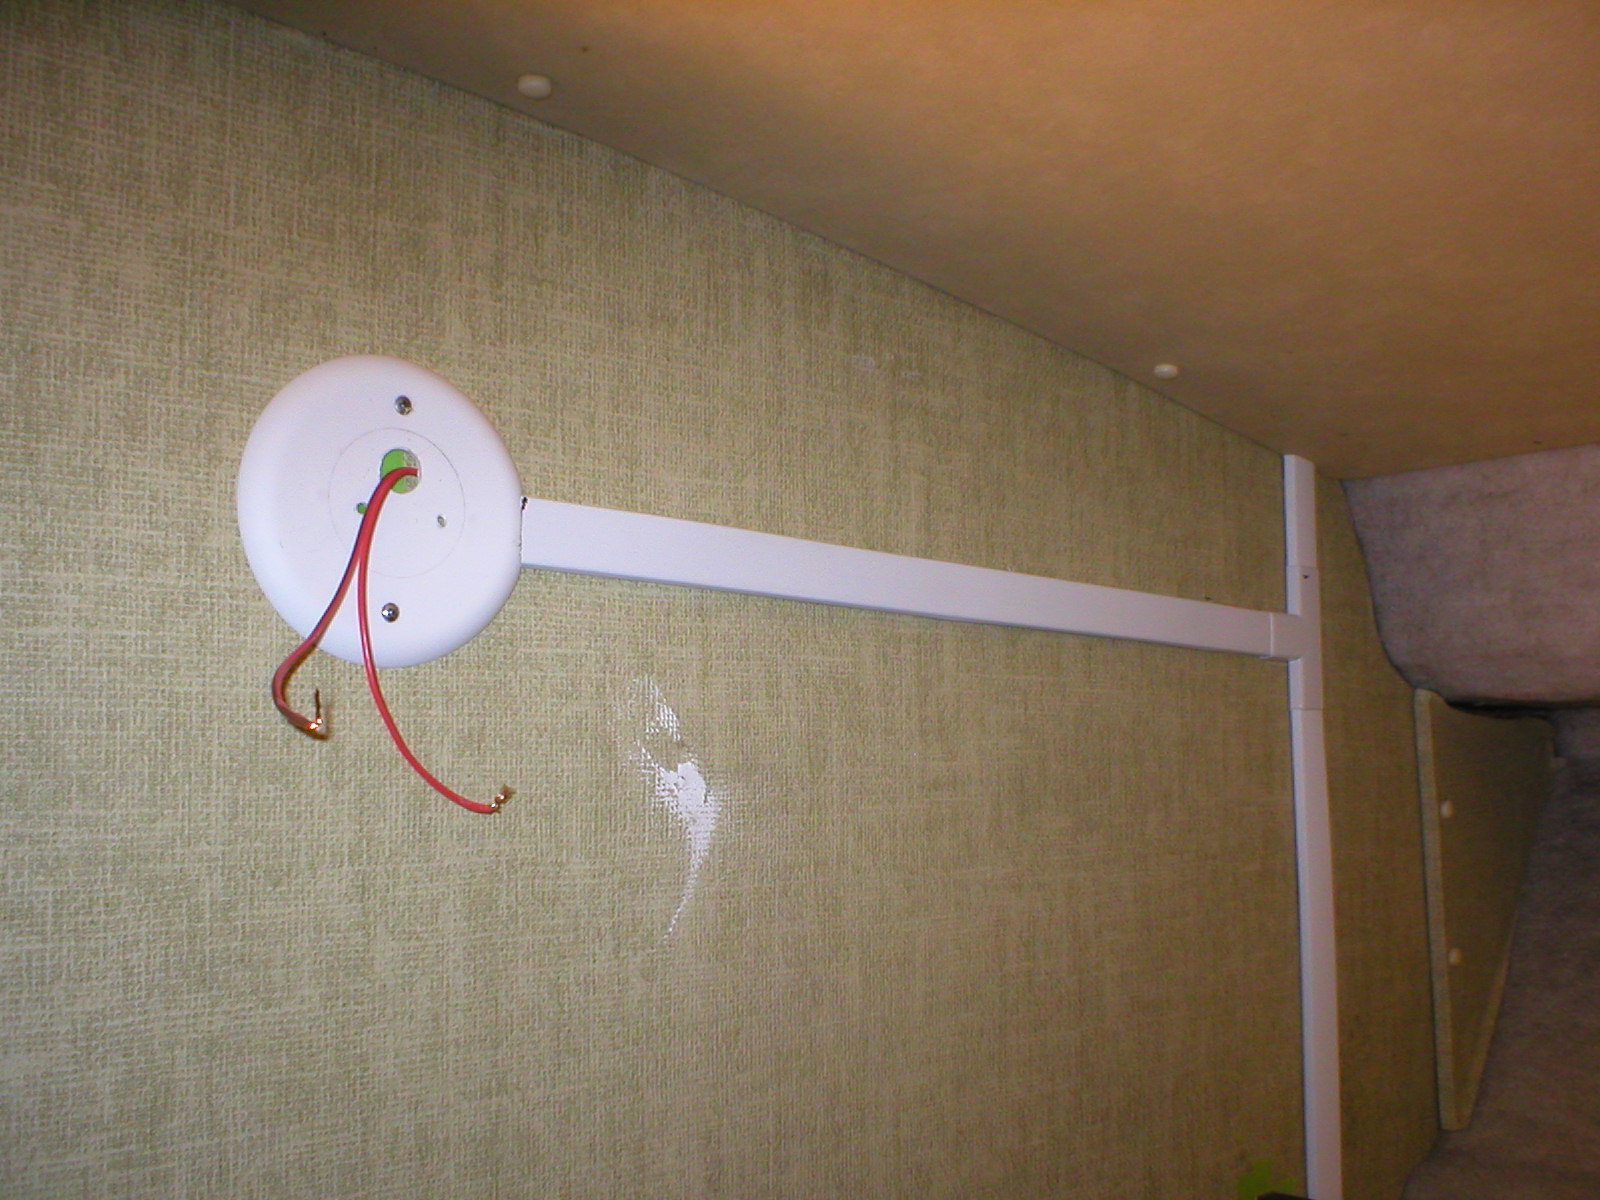
Where else to you get a blog showing a picture of two wires coming though a hole?

On Sunday, after a good long dose of The New York Times, we tackled the forward wall of the guest berth. As we mention in the video, learning how to work with this plastic raceway is an interesting but useless new skill. We'll probably never use this stuff again but it worked just fine for what we're trying to accomplish.


Once all the plastic raceway pieces were cut and snapped in place, it looked good. Well, here the whole wall looks somewhat rough, but once we sand down the spackling compound and apply two coats of paint, it should look as though no one ever did any redecorating.

That round piece where out reading light will mount is testament to taking a walk through Home Depot before you start making something new. We needed something that would allow us to get the wires behind the reading light and still look good. Frances and I found this $1.98 plastic thing that is meant to cover a hole once a ceiling fixture was removed.


We used a Dremel to cut a notch in the side and also drilled mounting holes for the new reading light. Worked perfectly.

Since we were on a roll, also taped off all the trim in the guest berth area so next weekend we'll be able to apply a coat of Sikkens. The taping took us less time than we thought it would, which is a first for most of our boat projects.


Sunday, March 13, 2016

Painting the guest berth - not yet


We were going to head down to the boat to paint the walls of the guest berth but before we could, Frances reminded us that we needed to clean all the walls and wood trim first. We agreed, of course,  and Frances filled our boat bag with all kinds of cleaners, rags and sponges. Painting is rewarding but scrubbing walls isn't.

Anyway, as usual, she was right. Cleaning all of that old wall covering was certainly worthwhile, as you can see from the way our sponge looked after the first swipe.

Honestly, we always thought we kept the boat nice and clean.

As we cleaned we began to realize that a lot of other prep work was going to be needed before any paint or varnish is applied. The wiring for the new reading light for the upper guest berth was going to be hidden in a plastic wiring raceway and will have to be installed first. (The wiring for the reading light in the v-berth is hidden by that plastic raceway shown in the photo above.)

The wiring (power and cable TV) for the television will also be hidden in another section of plastic raceway on the opposite wall. As it is, those wires are all exposed. If we're going to refinish this area, we might a well do it right.


There are also numerous holes where stuff was mounted over the years. We'll fill the holes and smooth over a few rips in the wall covering with spackling compound. Once we finish all of this, there will be no exposed wires anywhere and those walls will look as smooth and even as the galley and head walls do.

As we were disconnecting everything, removed this amazingly ugly 1970s era RV reading light that was hidden away up in one corner. This was original equipment on the boat and there were several more of them that we previously replaced. The light comes from a 12-volt tail light bulb that heats up to about 200 degrees after a few minutes' use. One neat feature is that if you fell asleep in your RV and left a few of these lights on, the RV battery would certainly be dead in the morning.


Sunday, March 6, 2016

New porthole project complete - finally

This project seems to have gone on forever although it's really only been four cold weekends.

On Saturday, Frances arrived to help and she was full of energy. That enabled us to get the third new porthole assembly - the one in the head - in and by the time we left that day, the old one removed from the port side v-berth.

Like a lot of projects that we attempt, we learn a lot as things progress. It took us forever to remove the old porthole assemblies, mainly due to the way about half the "stainless" nuts had fused onto the machine screws and the fact that since Silverton didn't use washers behind those nuts, they were firmly embedded in the plastic porthole housing. No way to get a wrench on those things.


By the time we got to the third porthole, it was time to add a little muscle. We used our tool with a cut-off wheel and hacked the old bolt heads off. Wow!  Lots of sparks and melted plastic but the old hatch was out in 15 minutes vs. 90 minutes doing it the hard way, bolt-by-bolt. We don't know why we didn't think of that before. But, "Whiskey-Tango-Foxtrot," as they say.


The new portholes are sealed properly and look great. Better yet, they all open and latch closed, which is more than you could say for the old ones. We now have some old mold around each hatch opening on the carpeted walls to deal with, but Frances has some really good stuff that removes it easily.

Having someone on the inside also made it easier to tighten the ten mounting bolts on each port.


 In the shot above, Bill is wearing his "headlamp," something that is really effective in a dim, cold storage shed. The fact that he looks fairly stupid wearing it makes no difference at all, except to Frances who breaks into wild laughter whenever she sees it. Odd, since she took the picture.


 At least you can see that we still have fun even in the winter storage shed.

We shot some video that includes Frances doing a "wrap up" comment on this project. She starts slow but quickly produces a take that covers many subjects. If you know her, you'll agree that if we didn't shut the camera off, she'd still be talking.

No worry. We wouldn't have her any other way.


Wednesday, March 2, 2016

Off topic - The Congressional Medal of Honor

I came across an item in the paper this week that a Navy SEAL, Senior Chief Special Warfare Operator Edward Byers, was to be awarded the Congressional Medal of Honor that day. I chose C-Span to watch the ceremony because it would show the whole thing, not just the 90 seconds or so that the commercial TV people usually pick out.

Yes, I had work to do but this seemed important.

About a thousand years ago, I was in the service, Army not Navy, and once, at Ft. Benning, I got to meet a guy who had won the Medal of Honor. He was an unassuming E7 (Sergeant First Class in the Army or Chief Petty Officer in the Navy). What was notable to me was the respect with which he was held. Everyone saluted him, officers included, even though E7s don't ever rate a salute.

No rant here. I just thought that some of you would like to see what people like this (38 years old, father of two) are out there doing for us.

http://www.c-span.org/video/?405741-1/medal-honor-ceremony

I hope the link works because it is well worth watching.