Saturday, February 23, 2013

Putting the bridge back together

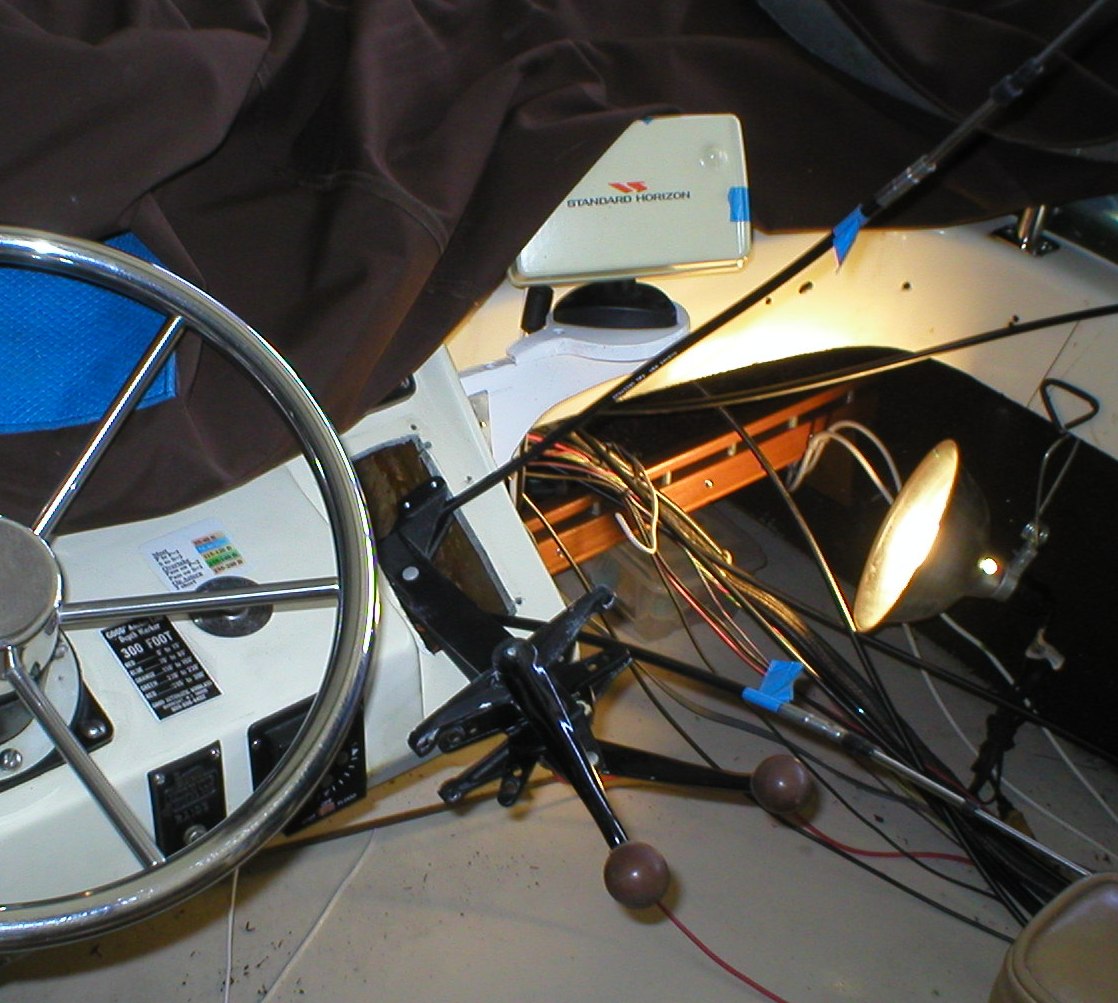
Back in January, we prepared to run the new control cables up to the bridge. That included dropping down all the factory wiring, hydraulic steering lines and the old control cables from where they were fastened up under the starboard side of the fly bridge. It sure was messy looking.

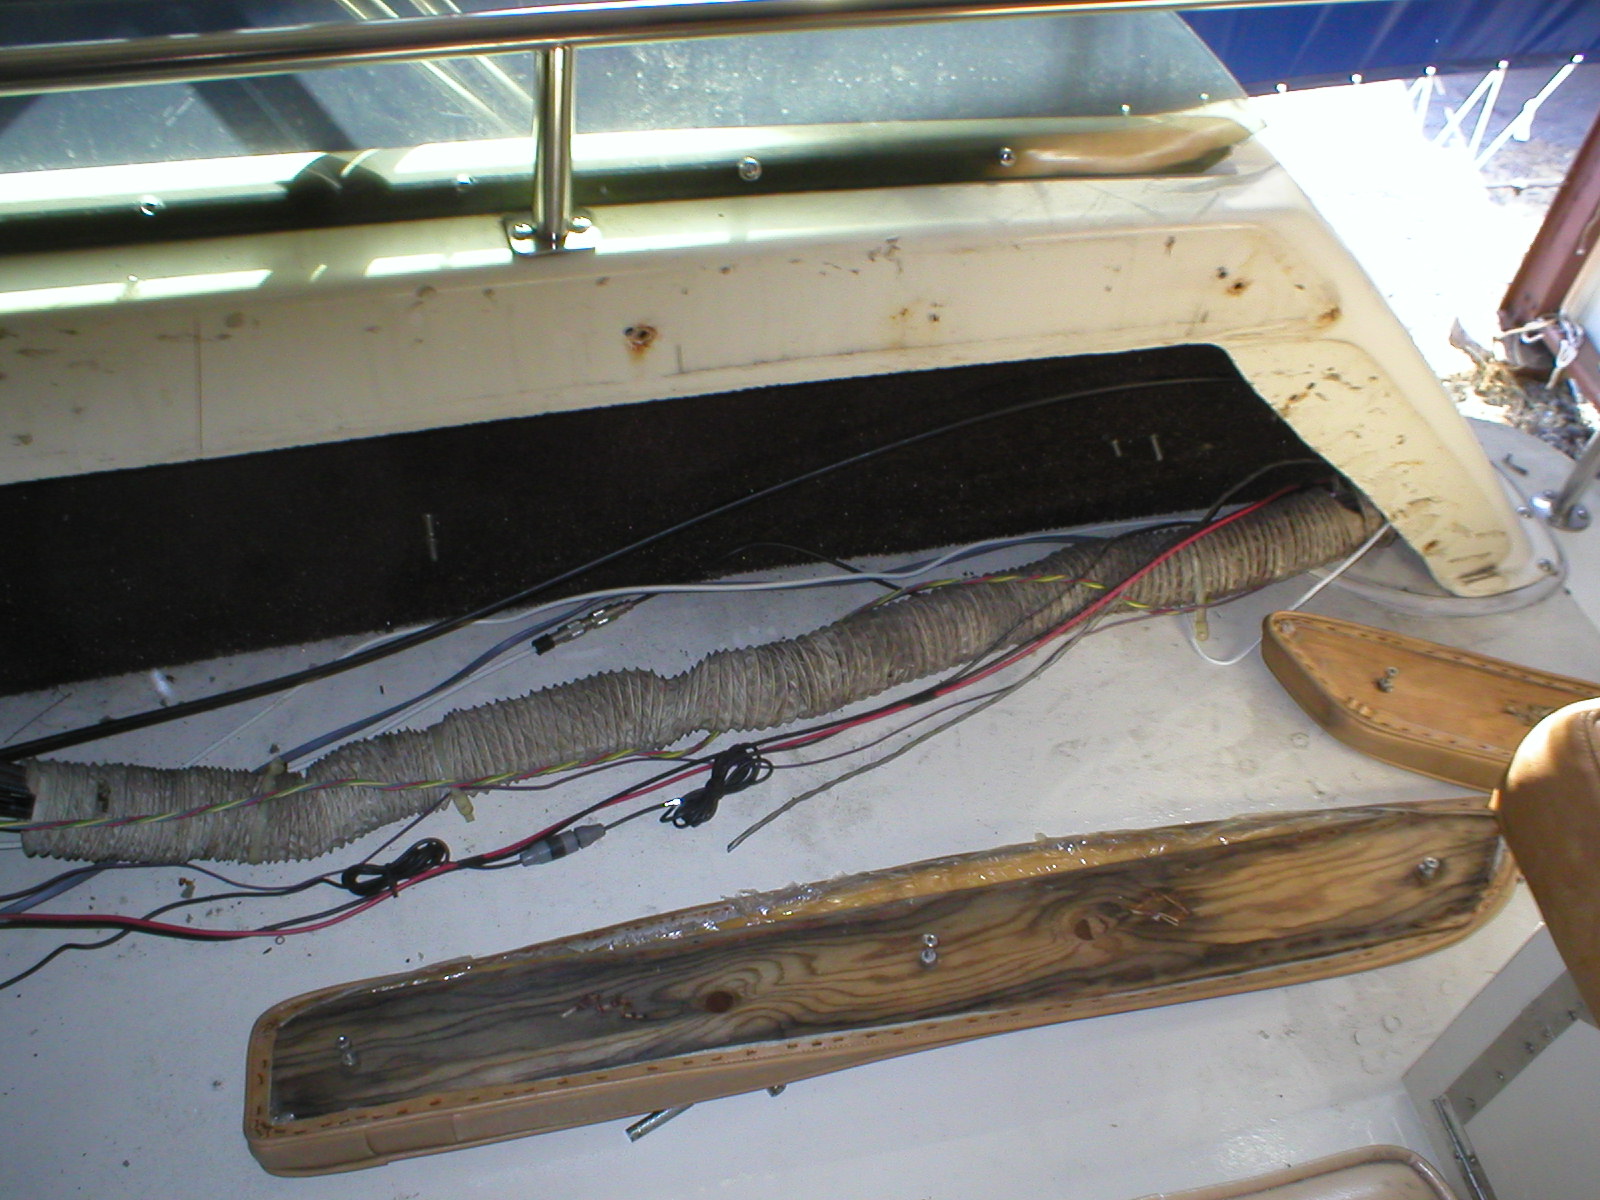
That dryer hose is the way the Silverton factory enclosed the boat's wiring harness. Most of the other wiring was added later by the previous owner (trim tabs, transducer for the depth sounder, etc.) While we were doing all this, we removed the Naugahyde bolsters and reconditioned and refastened them.

Today, everything was reassembled. It's nice to be able to put things together rather than take them apart.


Looks like we forgot to pick up that 7/16" wrench. That's the size of the nuts that hold the bolsters in place.


The dryer vent hose is gone and all the wiring is neatly fastened up out of sight.

Part of this project involved removing the mounting for the marine VHF radio.  We made a completely new mount that will forever be free of wood spores. Here it is before we put it in place.


Once we had it mounted we turned on the radio and admired how good it looked. Of course, no one will ever notice because the radio is in exactly the same location it used to be, but we like to know that it has been done properly.


For some time, we've wanted to add a amateur radio to our fly bridge.This would just be for fun and perhaps make some contacts when we were at the dock. As it happens, we had a radio that we could use, but could never figure out how to mount it so that it was out of the way and could be removed when not in use. Ham radios aren't as weather proof as the radios sold for marine use.

The radio we had available was an Icom IC-V8000, a somewhat elderly (2001) two-meter transceiver that is about the same size as our marine radio. We decided that the IC-V8000 could be mounted directly under our marine radio.  We made some brackets after a lot of measurement.


Before leaving the boat on Saturday, we had to at least test fit the IC-V8000 to see if it would work. Turns out, it should work under the marine VHF radio, just fine.


Part of this project has been to run new #8 12 VDC cables from the batteries (through circuit breakers) to both helms. Silverton's original wiring simply isn't adequate to operate a radar, VHF marine radio, chart plotter and an air horn, among other accessories. It isn't good if the chart plotter goes dim and recycles when you key the marine radio.

That new wiring has been completed at the lower helm, so our next task will be to wire those two new power cables and a ground to the upper helm.

On Sunday, we gathered up our tools and headed up to the fly bridge to spend an afternoon laying on our back under the helm console. We hadn't been up there for more than five minutes before we had to go back down to the cabin to grab another tool. This went on all afternoon until we had half the tools we own up there under the console. Hey, it's good exercise!

To distribute the power from the new +12 volt cables, we're using terminal blocks that we bought from Del City. They work well for connecting a large wire like a #8 to a number of accessories.

This is the terminal block that will power the port side of the bridge wiring after we had connected just the +12 volt cable from the radar.


These terminal blocks have caps that slide over the tops to protect the wiring from unintentional contact with something else. We'll install those after all the connections have been made.

There's not a lot of room to work behind this helm. Silverton's original wiring is incredibly sloppy so as we went along, we cut out lots of poorly routed wires and re-routed them.

The starboard side was a little more complicated and much more difficult to access. We found a place to mount the terminal block on that side and connected accessories such as the motor for the remote controlled spotlight (which we never use) and the power the the trim tabs.


To be clear, what we are adding is new capacity in parallel with the boat's original wiring. We haven't removed any of the factory wiring.

It was getting cold late in then afternoon and we stopped there.

The ground circuit will require more thought. Silertion's grounds were carried by two #16 wires, certainly not adequate in today's world.  We've added one #8 ground wire that is connected to the  negative sides of both battery banks. How we make all of those ground connections on the fly bridge is going to take some thought.

Thursday, February 21, 2013

10,000 page views

It's hard to believe that in the 2-1/2 years that we have written this blog (169 blog posts), it has accumulated more than 10,000 page views. 

We're just a couple of people who enjoy being on, and fixing up, an old Silverton. We started it to keep a record of what we were doing and to stay in contact with friends and fellow boaters during the off season. Of course, when we started it, we had no idea of how much reach a blog could have.

We have access to a "dashboard" that shows us how many people visit our blog and where (very generally) they come from. Every once in a while, we post something that draws a lot of viewers and we don't really know why. If we write a post about a trip we took to some destination (even if not on our boat), the readership increases dramatically.

We seemed to have hit a popular subject when we wrote about rebuilting our engines' heat exchangers last winter. The recent posts about installing new control cables also drew a lot of attention. We guess that there are lots of folks out there who use Google to help with their boat projects and we're glad if what we write is helpful.

We get nothing back from Google or anyone else for what we post. Just had to say that.

We enjoy writing this blog and we hope that you will continue to read it.

Saturday, February 16, 2013

Getting the knobs even

We had to take last weekend off for the blizzard and we won't bore you with snow photos. Everyone around here had a lot of snow and in some areas it was much worse than Hartford or Suffield.

This Saturday, we again tried to finish the installation of the transmission and throttle control cables. When we left the boat two weeks ago, we still had to connect the starboard side cables to the transmission itself.  The shifting lever on the transmission is located on the outboard side, so we had to crawl back behind the engine. We did this numerous times until we finally had all the tools and hardware we'd need. Here are the new cables finally in the original bracket and connected to the shift lever.


We tried operating all of the controls from both the lower helm and the bridge and they worked fine, in fact so much smoother than the old cables that we're glad we finally got this project done. But there was one thing that bothered us. The control handles weren't exactly even. Maybe we've grown overly anal with age, but as you advance the throttles, for instance, they should apply power evenly.  When you shift the transmissions into reverse, both levers should be in exactly the same position. They certainly are on a new boat and we'd be damned if they weren't going to on our old boat.

The fittings on the controls screw onto the ends of the control cables. When we installed them on the new cables, we screwed them all the way on, until they bottomed out. That, we thought, would make the cable travel the same throughout. It didn't.


For the throttle cables, that was too tight. In other words, with the controls pulled all the way back, the carb linkage was against the curb idle set screws as they should be but when the throttles were advanced, there wasn't enough travel to even open the carb secondaries.

We started with the transmissions since they had positive forward and reverse stops. We adjusted the cables at the transmissions by unscrewing the fittings on the ends of the cables exactly the same number of turns (8) and then made the same adjustment at the upper and lower helms. This would have been fun to watch since we need both engine hatches open to work on the transmission ends but when the hatches are open, the ladder to the bridge must be removed. It was quite a workout putting up the ladder, checking the controls on the bridge and going back down below, removing the ladder so we could open the engine hatches yet again so we could get to the engines. We did this a number of times and we will say that the extra exercise kept up warm.

The port transmission still used the old cables since they always worked very smoothly but in the end, we had to disconnect those too at both ends and do our spin-the-fittings routine to get a solid reverse and solid forward.


The throttle cables took a little more adjustment to get the throttle levers (and the carb linkage) even when at an idle and then get maximum travel (also evenly) when the controls were advanced. Here's a pictures of them before we began adjusting them.


Once we got all four throttle cables adjusted to our satisfaction, it was time to declare the cable installation finished. The lever position for all of the upper and lower controls are even and all have enough travel to work properly. Next we move on to connecting the new power cables to the upper helm.

On Sunday, we loaded everything up and headed to Portland once again with a clear work plan in our mind. It was just below freezing at the boat yard and the wind was blowing like stink.  We took the cover off of the bridge and began to figure out how we'd move all the wiring and cables back up under the bridge coaming. Unable to move around much laying on our back, we quickly became really cold. Eventually, we gave up and went home to do some projects there (like vacuuming).

Next weekend will come soon enough.

Saturday, February 2, 2013

Installing the upper helm cables


We havn't been looking forward to this. Getting three new control cables up (or down) that little PVC tube from the bridge to the engine space wasn't going to be fun. While we waited for the third cable to come in, we thought long and hard about just how we'd approach it.

  • The cables are long (27, 29 and 30 ft.) and are really not that flexible
  • There are a lot of electrical cables in the pipe already and we need every one of them
  • We'd need two people: One to push and one to pull
  • The PVC pipe in the engine space is almost out of reach
  • It's cold on the boat.
We discussed this at home, made sketches and finally on Saturday morning, drove down to the boat and unloaded everything. Once we got there we donned our fagins over plastic gloves in the hope that they would help keep our hands warm enough to work.


We pulled off the winter cover that protects the bridge, unpacked the three cables and marked the length on each one.  We also fired up the electric heater in the cabin so we'd have some place to go to get warm.

These cables definitely had a mind of their own. Keeping them untangled was a challenge so we draped them out over the front of the bridge.


Our plan was to tape all three cables together staggering them by about seven inches so we wouldn't have a lump to force down the pipe.


As we wrapped, we included a length of plastic clothesline that we had pulled up the pipe when we installed then new bridge power cables. That would be our pilot line.

Frances went below to the engine space to pull on the clothesline and I pushed the beginning of the cable-wrap into the pipe. As Francse gently tugged on the line, I pushed the control cables into the pipe. Amazingly, that worked great.The control cables slid into the pipe easily as long as we coordinated our pull and pushing. Then the cables stopped. We were snagged on something. No amount of pulling on our clothesline helped. Damn! Things were going so well.

I went below, crawled down behind the starboard engine and up over the v-drive.


 I shined a light on the end of the pipe and there were our control cables! The clothesline was hopelessly tangled in the wiring but our cables had made the trip and they wouldn't go any further because they were hitting a vent hose. I untangled the clothesline, pulled the bundled cables to one side and pulled all three all the way down to the space between the engines.

While we congratulated ourselves, we cut the tape off and routed the three cables to their final destinations: 30 ft. cable to the port carb, 29 ft. cable to the starboard carb and the 27 ft. cable to the starboard transmission.

As we said in a previous post, we decided not to change the port transmission cable on either the upper or lower helm because it worked effortlessly Why spend money when we didn't have to?

Then it was time to route the other ends of the cables up behind the upper helm. We didn't follow the factory routing exactly but they went in just fine. Actually, each of the three cables could have been at least a foot shorter but there was no way to know that until they were installed.


 We'll do the final corrections later. This was enough for one afternoon.

We took ourselves to lunch at Farrell's, a local watering hole, where the soup helped get us back to normal operating temperature.

Then it was a stop at the Portland Public Library to attend the opening of a photography exhibition by our old friend Stu Noelte. Stu is a former boater and is the person responsible for us owning our last boat, "Mad Dog." With boating out of his system, Stu now has a MFA degree and is the art teacher at Portland High School. He is also a gifted photographer and his favorite subject is trains and that's what his show was all about: beautifully photographed trains complete with photo captions that we found fascinating.

For those of you who don't know, there are many "railfans" who find and follow trains and know a great deal about them. Many of Stu's railroading friends attended his opening and we even met people there that we knew.


Stu is the guy in the center and the blonde with the great smile is his friend Loren, who we have always wanted to meet.


There was quite a crowd and the Portland library was the perfect setting for his show. We talked to one couple who has driven from Pennsylvania to see his work.

Getting the damn control cables in was good.  Seeing Stu's photographs and meeting some of his railfan friends was perfect.

On Sunday, we began connecting the new cables to the upper helm controls and the engines. The helm controls have little ball joints that thread onto the cable ends. New new cables came with jam-nuts that are used to keep the ball joints from unscrewing, although we don't see how they ever could. We took some care here to screw each fitting on the cable ends exactly the same number of turns so that the controls would be even. It has always irritated us that for a particular throttle setting on this boat, the handles on the helm control were uneven.

It takes two open-end wrenches to secure the ball joints at the end of the new cables to the helm control.


With the upper ends of the cables connected, we headed down to the engine space to connect the cables to the carb linkage. Silverton used an odd little double bracket arrangement to secure the cable housing to the engine and it took us a while to get both the upper and lower helm throttle cables in the bracket just where they were supposed to be. This took longer than we thought it would.

At the ends of the cable, we mounted the fittings from the old cables and did our best to make sure they were absolutely even. Here's the starboard throttle cables attached to the Edelbrock carb.


The connection to the throttle arm on the carb is little unorthodox but it works.

Before leaving for the day, we connected the new cables to the port engine and then tested the upper and lower throttle controls, which had always been sticky and unpredictable. Now the throttle travel is even and smooth, although there is a little more drag that we expected. No problem, though. The throttles advance very nicely with a lot less effort and when brought down, cause the linkage to bottom out on the curb idle stops perfectly.

We still have to connect a new cable to the starboard transmission and that will take some crawling around in the bulge but we're used to that.


Sunday, January 27, 2013

Williamstown weekend


Every other winter, we drive to Williamstown, Mass to visit The Clark (actually named The Sterling and Francine Clark Institute of Art but known to just about everyone as just "The Clark").  It's really a fun weekend for us because we love The Clark and enjoy poking about Williamstown. This year, we picked a very cold weekend, just about as cold as we can remember it being in in a long time (just enough colder than Hartford to make it worthwhile).

On our first trip eight years ago, we stayed at the Williamstown Inn. It's right on the green and looks good from the outside but we found it expensive and noisy. Since then, we picked a motel from memory or through an Internet search. This year we booked an overnight through Priceline at the Willows Motel for just $65.  This place doesn't look like much in the dead of winter, but was it clean, warm and very comfortable. There appeared to be just one other guest beside us. If some of you are long time readers of our blog, you  may remember an entry a few years ago about another motel.  The first question I always ask (this is FH speaking) is where is the ice machine.  We were told at that place that they did not have any.  Since we always go in the dead of winter, maybe they assume we will harvest ice cycles. We were told at that time, if we needed ice for our medications, we could come down to the office.  Well, this year we were advised to go across the street to the Cumberland Farms and purchase a bag of ice for 99 cent.Too funny...


We stopped at The Clark just to see what their Sunday hours were and then drove into North Adams, right down the road. Not much going on there except we did notice a dozen or so big new wind generators on the top of the mountain.  Then we unloaded our stuff at the Willows and broke out Frances' always-welcome picnic basket: vodka, wine, orange juice, cheese, crackers, special glasses from Stowe, napkins and utensils. We were many miles from the nearest boat but cocktail hour simply had to go on.

Frances fired up her little computer and we picked a place to have dinner. One of the docents at The Clark had recommended a place called Hobson & Choice that was located nearby. We booked a table and headed out into the cold. God, was it cold!

Dinner at Hobson's Choice was excellent as was the service.  Even better, it wasn't crowded, probably because Williams College students were on winter break.  It was very homey and populated by locals and
beautifully age knotty pine every where.

On Sunday morning, Bill headed out to a nearby Dunkin Donuts for two coffees while Frances took a shower. On return, Bill set the parking brake on our reliable old Mercury and snapped the frozen parking brake cable. No big deal but it was that cold!

Finding a place to have breakfast also took some computer assistance but we did locate the Chef's Hat that was apparently on Route 7.  We called them for an exact location but they sent us in the wrong direction. We eventually found the place and had a good breakfast although, note for next time, don't sit near a window. Also note the very good home made hash. Just excellent. And it was another knotty pine lined local hangout.

After breakfast, we drove over to The Clark. Much of the facility is closed while they do a major expansion. Frances took pictures of the construction. The plan is to have this finished in mid-2014, so we'll have to come back again then.


The Clark has several fascinating audio-visual presentations that describe the benefits of the new construction.


Even during construction, The Clark is still well worth a visit. One gallery contains some of the The Clark's most famous paintings. That room also offered a way for us to virtually arrange some of these great paintings within the room. The software is called "UCurate" and as we arranged the paintings via computer, we learned that we could download the software and play again at home.

Here's what our gallery looked like. Yes, we arranged all those works. It was really fun.If you are an art nerd and would like to create your own gallery, go to www.clarkart.edu and find clark remix...it's pretty intuitive, but will require that you down load their veiwer-seems harmless.  You can change the gallery's color of the walls and then add pictures and other artwork.  I would like to send a screen shot story of what to do, but have run out of time...enjoy (FH)


Back to boat work next weekend.

Friday, January 25, 2013

Fly bridge bolsters finished

As we mentioned previously, we removed the Naugahyde bolsters that run along the top of the starboard side of the bridge to get more access to the space below where we are going to install new control cables. This is what it looked like when we first got them off.

After taking these things off, we cleaned all the rust and grime off the fiberglass and waxed it. We know. No one's ever going to see it after the bolsters are remounted but we like to know that it was done right.

The long section shown at the bottom of the photo had burst along one side. All of the little steel staples had rusted away.

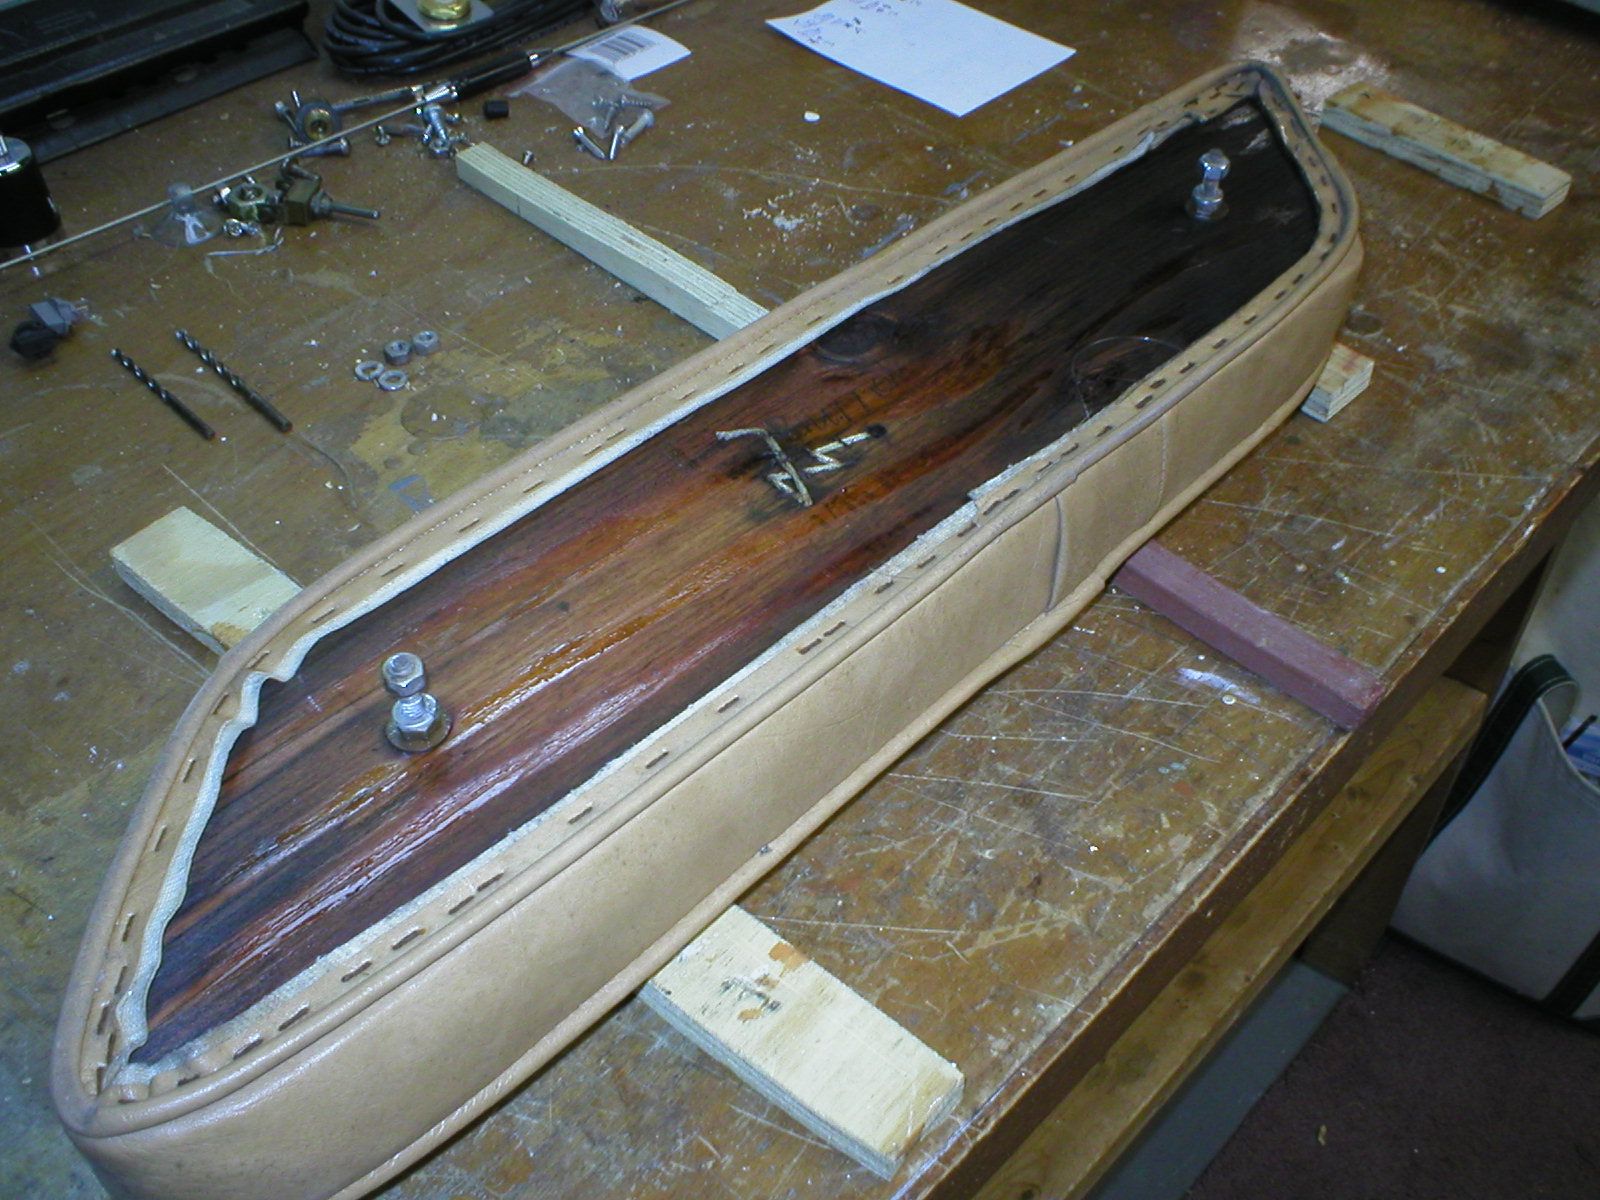
As we said in the last blog post, we also removed the port side bolsters and took everything home for rehab. It took four applications of Smith's CPES over four evenings to bring the wood back. We used 3/8-inch stainless staples to reinforce the Naugahyde where it was fastened to the plywood backing around the edges of all of the bolsters. It took two of us to carefully stuff the foam back and staple that one long bolster where the old staples had given away.

Then we took over the kitchen counter to thoroughly and clean each piece and it was amazing how much grime was on them after 32 years. We finished up with two applications of ArmorAll, although we had to soak the ArmorAll bottle in hot water before we could use it because it was frozen in our garage.

This little extra job was worth the effort. The bolsters look brand new and are ready to be reinstalled. In the meantime, they are being stored on our washer and dryer. With the cold weather, we're beginning to run out of space inside to store our various project parts.


Like everything else on this boat, one project uncovers another. To get one of the curved bolsters off, we had to disconnect the marine VHF radio. We never liked the way we had to originally fastened it to a piece of plywood that some idiot had jammed up under the helm and attempted to screw to the fiberglass, so that came out too.  We took some measurements and made some drawings to see if we couldn't fabricate a better mounting method.  We'd also like to make room to mount a second radio (amateur 144 MHz and 440 MHz transceiver) next to or under the marine radio.  That's proving to be more difficult than we thought, but we have some ideas.

Next weekend (January 26-27) we've taking a break from the boat to visit the Clark Museum in Williamstown Mass. Even for dedicated boat nuts like us, sometimes it's better to have fun doing something else.

Sunday, January 20, 2013

New power to the bridge

Other obligations kept us from boat work on Saturday (probably a good thing) but Sunday, with the snow melting and the temperature close to 50 degrees, we were back on the boat.

Our goal was to run new DC power cables from the batteries to the bridge helm. Like the lower helm, we want the starboard instruments and ignition circuit to operate from the starboard batteries and the same for the port side.  That meant running two #8 wires up from the batteries and one ground (also #8) because the original wiring seems to have a very robust ground circuit. These new power wires would parallel the original Silverton ignition wiring.

Once at the upper helm, we would divide the various accessory loads between the two new circuits. That will include the radar, the VHF radio, the chart plotter, the trim tabs and the air horn and, if we can fine the space, our 2-meter-70 CM amateur radio.

#8 cable has a mind of its own as soon it is off the spool. Keeping everything untangled took a little time.  Here's the wiring on its way to the bridge.


The white wire is actually plastic clothes line, which we had to pull up so that we'd have a pilot line to install the new transmission and throttle control cables later.

It took some tugging and running back down to untangle with wires but after a while, we got the wire bundle up the access tube on the starboard side and onto the bridge We then routed the three wires (less the clothes line) up under the helm were they will be connected.

Not a very interesting photo but it was great to see those big wires where they are supposed to be.


In the course of pulling up these wires, one of the loose #8 wires snagged our four-cell LED Maglight that was sitting on the deck and while we watched from above, flipped it into the bilge where we could hear it rolling down under the starboard engine. We'll put out a search party for that later.

When we started this part of the rewiring project, we removed the starboard Naugahyde bolsters so we could get a better look at all the wiring. This week, we thought WTF, why not take the port side bolsters off too and bring them home for cleaning and reconditioning?

As we mentioned previously, these bolsters are Naugahyde over foam, stapled to 1/4-inch plywood. They were in amazingly good shape for a 32-year old boat but the plywood had some small punky spots. We decided to apply Smith's CPES to the exposed plywood. CPES takes us back to our wood boat days, where it never failed us.  CPES glues old wood fibers together and stops the wood spores that create the rot. We brushed it on liberally and watched the plywood soak it up. More is better here and when the wood stops absorbing the CPES, that's enough.  Here's a bolster after a first application of CPES.  We'll reinforce each bolster with stainless staples before we reinstall them.


During the week, we also got a chance to strengthen our little cockpit ladder.  It seemed to us that simply gluing the steps back together would never hold up to frequent use on the boat so we added some aluminum strips, fastened to each section of step.


This was done on the bottom of each step, so no one will ever notice our "product improvement."