Sunday, March 28, 2010

Arranging the Furniture

Despite the fact that winter-like weather returned this weekend, we decided to move everything to the boat and arrange things. On Saturday, we took the bridge seat to the boat and got it up to the flybridge. After getting it in place on the port side, the Commodore-in-Charge of Where-Stuff Goes, decided that it should be relocated to the starboard side of the bridge. It does look better there and gives us lots more room to move around.


That wasn't enough for one day so we also applied the original boat-name logo to the stripes on the side of the cabin...

 Finally, we masked the foredeck so that we could repaint the non-skid areas. Bill masked the straight areas and Frances did all the curves.


 .

Too cold to apply any paint this weekend so we went home and began to plot Sunday's activities.

Sunday dawned cold and damp, although not raining.  We decided to move the Romanian table (See December 5) down to the boat. This thing is really heavy so we disassembled as much of it as we could and using two cars, trucked it down to the boat yard.

There was no one around to shoot pictures of us hefting this thing onto the swim platform and then over the railing onto the boat, but working together, we got it into the salon and began the re-assembly.


Once re-assembled, we moved the Romanian table and Klobo, the new love seat, back and forth, forward and aft, until we hit the sweet spot.  Frances said, "That's perfect," and I sat down to check things out.  Just perfect for having a cocktail.


Our Romanian table replaces a Silverton original high-low table. This is something that Silverton probably bought by the hundreds back then and is really unique. In its down position, it is a coffee table. Pull the little handles on the side and it springs up to a not-quite-high-enough dining table. Watch out, though, when it comes up to its full height, it could knock your front teeth out. It is now in my basement.


That was about it for this weekend. Things in the salon look good and the repositioning of the furniture yielded a lot more space than we thought.


Friday, March 26, 2010

Bridge Seating, the End

This thing has been sitting in our basement for a month. Every time we passed it, it looked up at us and said, "Finish me!"

So, we did just that.  First, a coat of primer and then some "Sandstone" color paint to match the deck. Next, a stainless piano hinge, cut to fit each door and latches to hold the doors closed. Frances added some door handles, probably from the Dollar Store, but they'll work great. She also carefully attended to a small cut in one of the seats with some magic patching stuff that actually works.

The stainless steel molding around the doors is from a 1960 28-ft. Luhrs that we owned many years ago. (We never throw away anything that is boat-related.) This molding is overkill for two small doors but we like the way it looks.

We added some rubber feet to the bottom and shimmed up the ones on the port side by 1/2-inch, so it would be level.

That's it. This seat goes on the boat tomorrow.


Saturday, March 20, 2010

Klobo

We took a road trip to Ikea in Stoughton, Mass. in search of a particular sofa that was out of stock at Ikea's New Haven store. We found what we wanted almost immediately but being the careful shopper that Frances is, we continued to look and measure. We knew exactly how much room we had to work with and when we measured the sofa that we had intended to buy, it seems too wide, meaning that it would stick out further from the salon wall than we wanted.

Then we saw Klobo, a loveseat that looked perfect, something that was was considerably less expensive than our original choice and would fit. We then did the warehouse pickup routine and before long Klobo was in the back of our station wagon on its way to its new home on Act Three.

We should mention, just in case you've never been to Ikea, that everything is named for its manufacturer. In this case, the loveseat was made by Klobo, which could well mean "Acme" or "Goldfarb" in Swedish, for all we know. However, our cartoon minds immediately latched onto the name.

"Captain Kirk, there's a Klobo entering our force field at mach 21!"


Here it is, in our salon. Time to assemble: 20 minutes.


Yes, all the tools, hoses and wire that formally occupied the salon floor are gone and thanks to Frances and some great carpet cleaner, so are the dirt and stains on the carpet that happened over the winter.

The engine hatches are closed with just about everything we wanted to do down there complete. The shabby old - and partially missing - accent stripes on the cabin side have even been been repainted.


And the boot stripe was repainted. Next, we tackle the bottom paint.


But we still had one more day to work this weekend so we cleaned and painted the fly bridge floor, which is actually the roof of the salon.


It looked pretty good once it was finished.


While this was going on, Frances scrubbed the cabin roof and decks, from the bow pulpit back as far as the windshield with Dirtex. Scrubbing like this on her hands and knees wasn't easy. We had to haul water to rinse it but now that it's really clean, it too can be painted.

Even though it had been a long day, Frances wanted to refinish the trim around the door under the vanity. She threw herself into that job, as she does with everything on this boat.


And as usual, her attention to detail paid off.


Tuesday, March 16, 2010

Bridge Seating... again

I was about to prime and paint the box we built to support the bridge seats (see Bridge Seating below) when Frances came up with a good idea.  Why not cut a door in the side of the box that supports the seats to make it easier to get to the storage space underneath? Lifting up one of the seats isn't very convenient, especially when someone is sitting on it.

Considering the length of the seat base, it made even more sense to cut two doors, instead of one. We measured and cut out two openings in the side of the seat support and will use the material we cut out as the doors.  Here's what it looks like with the door openings cut and a layer of  System 3 Epoxy resin applied to all the plywood surfaces except the bottom.


Sunday, March 14, 2010

Finally, the list is getting shorter

Today was a day to scratch three more things off the list, two relatively minor and one that will require several weeks to complete.

First, we noticed that one of the passive ventilation grills on the starboard side was broken. (This boats takes in fresh air on the starboard side and exhausts it on the port side.)  Since the PO left us with two brand new vents, we removed the broken vent today and replaced it with a new one. Sounds easy but it wasn't. Behind the vent intake is a plastic manifold that holds two vent hoses that go to the bilge and engine space. I won't bother describing how this arrangement is held together or what happens when you remove one of the exterior vents. Needless to say, what looked like it would take 15 minutes took more than an hour spent standing on the top of a ladder. OK, now we have a new vent in place and our leg muscles got a workout.

Then we tackled the soft spot on the rear deck. Because the upper fiberglass skin of the deck had been breached, we couldn't let this go and it's about time we did a real fiberglass repair, since we now own a fiberglass boat!

The deck construction from the top down is Gelcoat, fiberglass cloth, then about 3/4-inch of balsa core and then the cockpit liner at the bottom, which is is all fiberglass with no coring. (The balsa, incidentally, is the same soft wood that you may have built model airplanes from when you were a kid. (Forget this handy reference if you are less than 50 years old.)

Balsa was widely used to build up the thickness of decks and sometimes entire hulls, although it has been replaced now with newer materials that do the same thing without balsa wood's drawbacks. The balsa coring can best be understood if you look at the edge of an ordinary corrugated box. The material between the outer and inner surfaces serves the same purpose as the balsa coring between two layers of fiberglass. Because it is the end grain of the core that bears the stress, it is quite strong.  Unfortunately, it also absorbs water and silently rots when it does.

In this case, the PO had installed rod holders - six of them - around the edge of the cockpit deck. All that took was a hole saw and very little thought.  The problem is, once that hole was cut and the rod holder installed, the balsa core was exposed to water that seeped under the edge of the road holder mounting plate. Sure, that took years but it is very predictable. 

What the PO should have done was cut the hole in the deck and then seal the insides of the hole with resin.  But he didn't.

We removed the offending rod holder and then used a small saw to cut out the soft spot on the deck.  The crap you see at the top is the wet balsa.  The hole is where the rod holder was.

The damage to the fiberglass deck took place when the wet balsa froze and expanded, pushing up through the deck. I kept cutting until I ran into undamaged balsa core.


The repair to a small area like this is fairly easy but the damaged area needs to dry completely first, as it will now that it is open  Is there other damage around the other rod holders? Probably, but it it isn't as severe and can wait another year before we get to it.

Bernie, our fiberglass guy, checked out the deck all the way around the boat and could only find problems around the rod holders.

The last thing for today was to install a fresh water faucet in the cockpit. Frances has wanted one for years and now, she'll finally have it. Drilling and running 1/2-inch water hose took better than an hour.  The faucet taps into the water line after the accumulator and check valve, so she'll be able to use it when we are at the dock plugged into city water or while we are underway.


Saturday, March 13, 2010

Earning our stripes

Stripes.

There are a number of them on this boat that we have to deal with. Starting at the bottom, there is the boot stripe. Originally there was an accent stripe above a wider 4-inch boot stripe and then a thin area with nothing and then the bottom paint. The accent stripe was still there (mostly) but the tape that Silverton used to create the wide boot top was gone and someone had simply painted a new black stripe in its place.  We applied our trusty heat gun and removed any tape stripe that remained.

If this is boring and complicated, we agree, but screw it up and the boat will look odd. We have to finish off this area where the hull meets the water.

We masked off a section and painted a test stripe using the same color we were going to use above on the cabin sides.


That looks as though it will work. Frances is the taping expert and based on this trial area, she'll tape off the top and bottom of the boot top all the way around the hull.  Then we'll paint it.

The bottom paint will come up that faint line below the boot stripe. That will require another taping,

Then there are the cabin sides to deal with. Silverton again applied tape to create accent stripe along under the windows.  Must have looked nice when the boat was new but now, most of it is gone.  We couldn't get off what tape was remaining even with our heat gun so we sanded the edges and masked the area.


This came out OK except for one little spot.  We'll get rid of that once the paint hardens.


We've started to put things back together now. There are fewer parts on the salon floor looking for a home. Some tools have removed. There is still a lot to do but we can now see being back in the water in early May.

Wednesday, March 10, 2010

Bridge Seating

Our fly bridge has two of those folding seating units that really make things crowded up there.  They are also quite low so that anyone sitting on one can't really see much looking ahead.

Last Sunday, we decided to remove one of these two seat units, thinking that for now, one of them up there would be enough.  Once we got it home and took it apart, it was easy to see how badly rotted the original 1/2-inch plywood base was. The base was built without the benefit of a single screw.  Everything was joined with steel staples and most of those had disappeared in rust. These things are original Silverton and you can still buy seats just like them at places like Cabela's.

However, the seats themselves were still in fairly good condition so we began thinking about building a new base.  We copied the dimensions from the old one so the old seats would fit and made a drawing. We could see where improvements could be made. We had enough 3/4-inch plywood on hand from what we bought to make the battery covers, so we could use that. The old seats were too low, so we designed the new base 15-inches high, rather than the 9-inches in the original.  Finally, since one of the two seats tilts up, we included a bottom in the new base so that the seat base could also be used for storage.

We skipped out of work at 2 PM and by 5:30 PM had a new seat base.  Everything is glued and screwed together with deck screws.  Here's the original Silverton seat base and its new replacement.


The forward seat is held in place by two little aluminum L-brackets and we ran out of light before we could put those in place today. However, the seats fit perfectly and whoever uses it will be able to see what's going on out ahead of us.


The color of the new seat base is bring studied by Frances.  I suggested filling the screw holes, priming it and painting it white but that suggestion was met with less than enthusiastic agreement. We'll see. Can't spend too much more time on this.

It may be boring for you to read about how someone made a small plywood box in an afternoon. But, it's fun for us to improve this old boat without spending a fortune and using as much of the original equipment as possible.

Saturday, March 6, 2010

Just a little piece of hose

Before we left the bilge, we wanted to fix one more thing on this fall's list. A little drip at the cold water inlet on the hot water heater. The cold water hose runs from the water pump, across the bulkhead behind the engines and connects to a T fitting. One leg of the T goes forward to route cold water to the sinks and toilet. The other leg, just a 12-inch section of 5/8" ID flexible hose, provides cold water to the water heater. The drip was where that little section of hose was clamped to the fitting on the water heater.

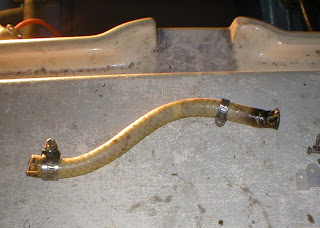
The problem was - and there is always a problem with fixing anything on an old boat - that in order to get to the leaking hose, we'd have to remove or at least push out of the way, the ventilation hoses and there were several. First we disconnected the vent hoses from where they were clamped to the bulkhead. Once they were out of the way, we could just barely reach the leaky section of hose. We used a utility knife to get this Silverton-original piece of hose off.


The discolored end at the right is where it had been leaking for who-knows-how-many years.
We bought a foot of new 5/8" ID hose and, after applying our trusty heat gun to soften it up, put it in place with new hose clamps. 

In the photo below, notice the two T fittings at the inlet of the water heater. Only one is really needed and even that could have been an elbow. The first T fitting has a plastic 1/2-inch hose barb adapter screwed into it to accept the hose that we replaced but that hose barb should be 5/8-inch, not 1/2-inch. That's probably one reason why it leaked.  We're hoping that the new heat-softened hose and hose clamp that we used will take up that extra 1/8-inch and not drip. If it does, we'll have to fix that next winter when, we hope, are arms will be about a foot longer. Failing that, we'll have to remove the entire water heater and re-plumb the hole thing properly.


Then it was time to fix the entire ventilation hose problem. The vent hose is actually 3-inch hose that was once used to vent the hot air from residential clothes dryers.  It is no long legal for residential use but is still used in boats where the air isn't heated. You can buy aluminum connectors for 3-inch hose and we got a handful of them.

The inlet hose on the bilge blower had long ago fallen off.  Several sections of hose where punctured and/or ripped open and hanging by the support wire.

We cut out all the damaged hose and using the connectors, added new hose. We reconnected the hose to the bilge blower and clamped it in place. For most of the hose connections, we added duct tape. It isn't all that sticky at 40 degrees, but if you give it a minute or two under the heat gun, duct tape conforms and sticks perfectly.  We hope we'll never have to take it off.


We also used duct tape at each place where the hose was supported so that when we tightened the cable ties, they wouldn't collapse the vent hose. 

Notice the charge indicator lights on the battery charger? All three are green, showing that the batteries are fully charged and ready to go. We've kept them that way all winter by plugging in the boat's power cord for 24 hours each weekend.

When we had the last survey done on our last boat, Mad Dog, the surveyor told us that we needed two bilge blowers, one for each engine.  We have only one right now on this boat and that's going to have to do for this year.  Adding a second bilge blower shouldn't be difficult next winter. (Yeah, right!)


We were going to get out of the bilge and move on to other things but decided to do something with the undersides of the engine covers before we did.  The PO had used contact cement to glue pieces of fiberglass insulation to the undersides of these big heavy hatches apparently in an effort to cut down on engine noise. If that's the reason for the fiberglass, it didn't work. The fiberglass was shredded and hanging loose in places so we hand scraped all the old stuff off, holding a Shop Vac to suck it up as it came off.

The engines hatches weren't pretty after this but at least the shredded fiberglass was gone.


We used a small roller and a chip brush to paint the undersides of these hatches.  It doesn't make the boat run any better but it sure improves the appearance.


OK, now we've out of the bilge and ready to start painting the trim and the bottom. We are so glad to see the engine space doors closed. It feels like we spent weeks down there.