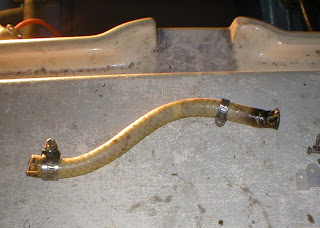
Before we left the bilge, we wanted to fix one more thing on this fall's list. A little drip at the cold water inlet on the hot water heater. The cold water hose runs from the water pump, across the bulkhead behind the engines and connects to a T fitting. One leg of the T goes forward to route cold water to the sinks and toilet. The other leg, just a 12-inch section of 5/8" ID flexible hose, provides cold water to the water heater. The drip was where that little section of hose was clamped to the fitting on the water heater.
The problem was - and there is always a problem with fixing anything on an old boat - that in order to get to the leaking hose, we'd have to remove or at least push out of the way, the ventilation hoses and there were several. First we disconnected the vent hoses from where they were clamped to the bulkhead. Once they were out of the way, we could just barely reach the leaky section of hose. We used a utility knife to get this Silverton-original piece of hose off.
The discolored end at the right is where it had been leaking for who-knows-how-many years.
We bought a foot of new 5/8" ID hose and, after applying our trusty heat gun to soften it up, put it in place with new hose clamps.
In the photo below, notice the two T fittings at the inlet of the water heater. Only one is really needed and even that could have been an elbow. The first T fitting has a plastic 1/2-inch hose barb adapter screwed into it to accept the hose that we replaced but that hose barb should be 5/8-inch, not 1/2-inch. That's probably one reason why it leaked. We're hoping that the new heat-softened hose and hose clamp that we used will take up that extra 1/8-inch and not drip. If it does, we'll have to fix that next winter when, we hope, are arms will be about a foot longer. Failing that, we'll have to remove the entire water heater and re-plumb the hole thing properly.
Then it was time to fix the entire ventilation hose problem. The vent hose is actually 3-inch hose that was once used to vent the hot air from residential clothes dryers. It is no long legal for residential use but is still used in boats where the air isn't heated. You can buy aluminum connectors for 3-inch hose and we got a handful of them.
The inlet hose on the bilge blower had long ago fallen off. Several sections of hose where punctured and/or ripped open and hanging by the support wire.
We cut out all the damaged hose and using the connectors, added new hose. We reconnected the hose to the bilge blower and clamped it in place. For most of the hose connections, we added duct tape. It isn't all that sticky at 40 degrees, but if you give it a minute or two under the heat gun, duct tape conforms and sticks perfectly. We hope we'll never have to take it off.
We also used duct tape at each place where the hose was supported so that when we tightened the cable ties, they wouldn't collapse the vent hose.
Notice the charge indicator lights on the battery charger? All three are green, showing that the batteries are fully charged and ready to go. We've kept them that way all winter by plugging in the boat's power cord for 24 hours each weekend.
When we had the last survey done on our last boat, Mad Dog, the surveyor told us that we needed two bilge blowers, one for each engine. We have only one right now on this boat and that's going to have to do for this year. Adding a second bilge blower shouldn't be difficult next winter. (Yeah, right!)
We were going to get out of the bilge and move on to other things but decided to do something with the undersides of the engine covers before we did. The PO had used contact cement to glue pieces of fiberglass insulation to the undersides of these big heavy hatches apparently in an effort to cut down on engine noise. If that's the reason for the fiberglass, it didn't work. The fiberglass was shredded and hanging loose in places so we hand scraped all the old stuff off, holding a Shop Vac to suck it up as it came off.
The engines hatches weren't pretty after this but at least the shredded fiberglass was gone.

We used a small roller and a chip brush to paint the undersides of these hatches. It doesn't make the boat run any better but it sure improves the appearance.

OK, now we've out of the bilge and ready to start painting the trim and the bottom. We are so glad to see the engine space doors closed. It feels like we spent weeks down there.


So many hoses; so little time! Do you have any skin left on your knuckles? Rob is currently lying in the bilge, relocating the batteries and water heater. I am reviewing charts for new destinations this summer.
ReplyDeleteHi CA,
ReplyDeleteThe knuckles have healed nicely, than you although I expect to have a few more before we get back into the water. We hope that Rob's weight-and-balance engineering pays off. Nothing like a no-list summer!