Saturday, March 30, 2013

Let's waste a few hours on the deck drains


We wanted to replace the fittings for the deck drains at the rear corners of the cockpit with ones that were flush so that crud wouldn't build up around the opening. There are two more of these that collect water at the lip that runs around the edge of the engine hatch. We know the drain area looks dirty. Give us a break. The boat's been in storage all winter.

Fine. We ordered four new fittings with nice flat tops that should fit easily. They were waiting for us when we arrived at the boat yard on Saturday morning.


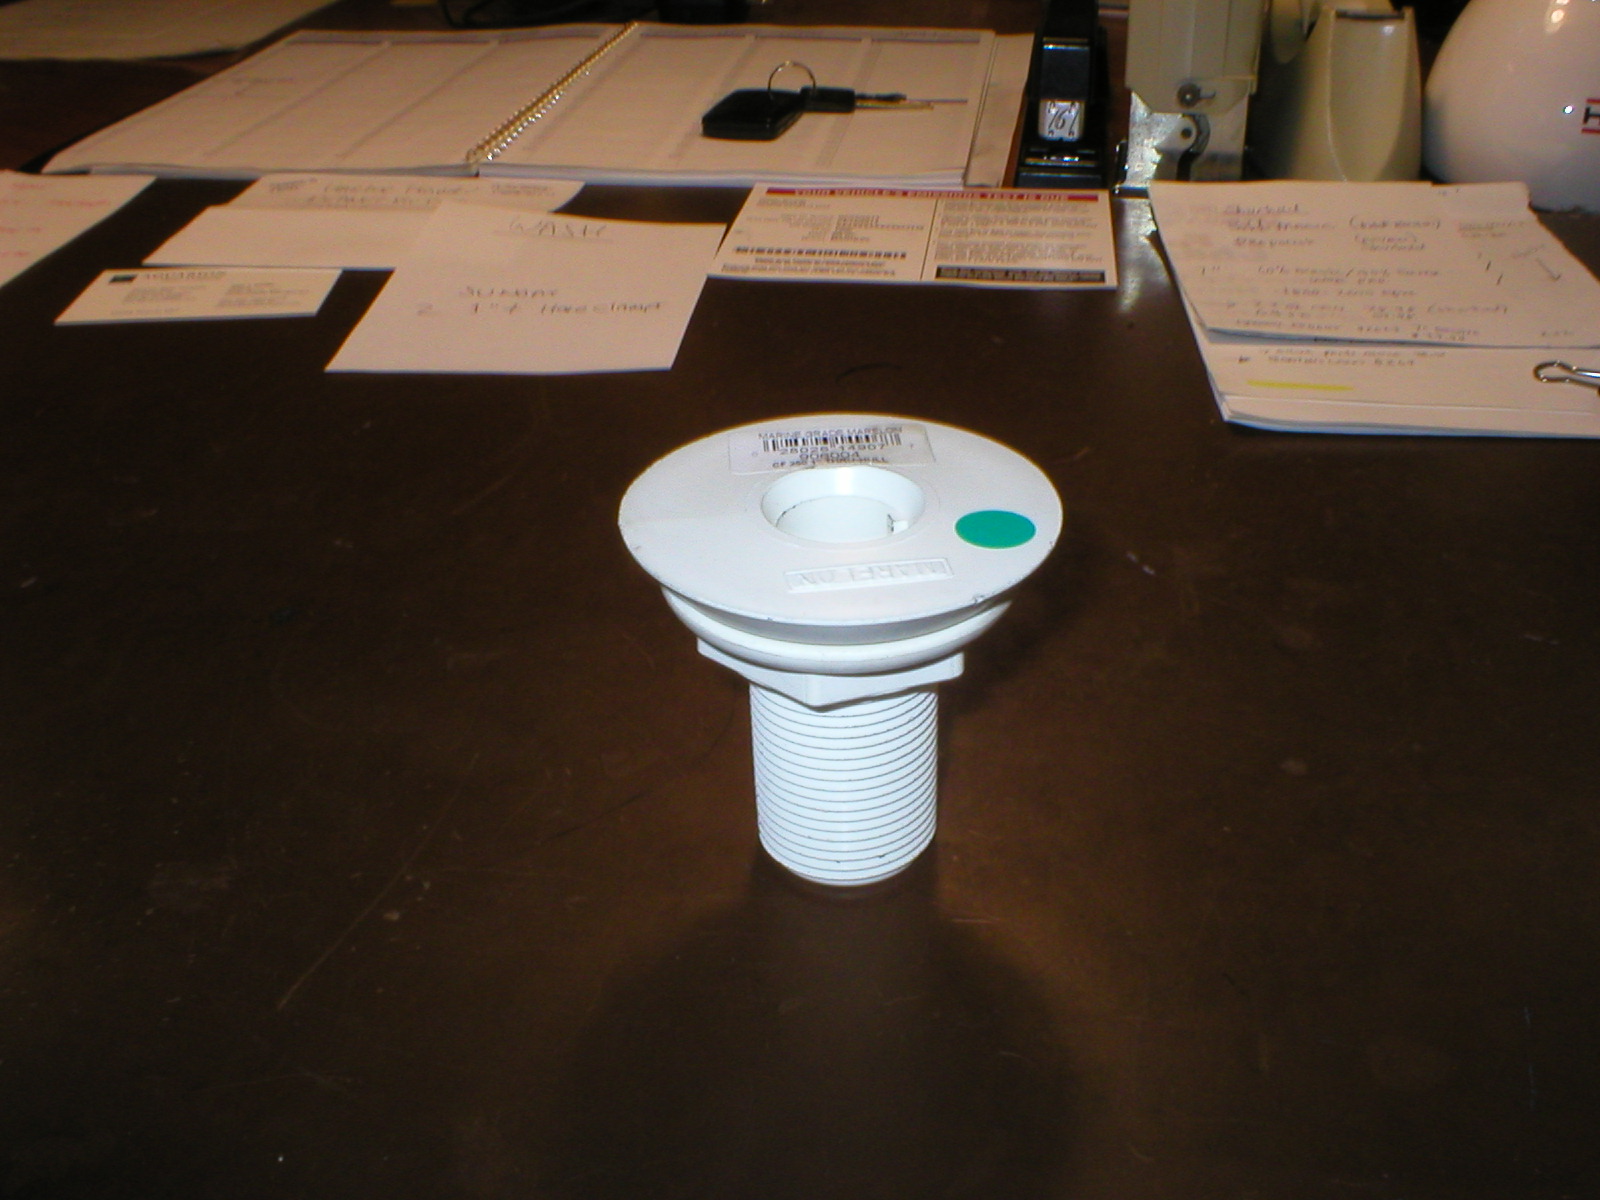
They are clearly marked "1-inch" but what's the size of that threaded neck onto which we have to install 1-inch hose?  It''s 1-1/8". What a royal pain the in butt that is, since the rest of the drain system is all plumbed with 1-inch ID hose.

Okay, we made up the difference in hose sizes by sliding a hunk of 1-inch hose up inside the piece of 1-1/8" hose that fits the threads on the fitting. Sloppy, but we got it to work.

The area where those two deck drains are located is very hard to reach. Actually, that's a understatement. Getting at the hose clamps was one step better than torture. Speaking of "tight," we need to come up with a 1-1/2" wrench to tighten the retaining nuts on those fittings. We'll need to check out our wrench inventory in the garage to see what we can come up with.

At this point, the port side drain is in place. Looks like we're going to have to bed the deck fittings in BoatLife or something similar because the one we put in today is leaking around that fitting.

This shot reminds us that we are going to power wash the bilge next fall. Anyhow, this is what the drains looked like from under the deck.


Before we left the boat on Saturday, we did some testing regarding polishing the hull of the boat. That's the last thing we'll do before going in the water. The websites we follow seem to give very high ratings to Shurhold Buff Magic and Pro Polish. We bought some of each and a buffer from Harbor Freight that should last at least one boating season. (It even came with a set of replacement motor brushes.)

The Buff Magic is basically very fine compound and we tried it (by hand, without the buffer) on a small section of the hull. The first application didn't seem to do much but a second application in an area of perhaps 2 ' x 2' took off all the old oxidation and the other stains. We'll have to use the polisher to apply this stuff because that's what they recommend. It should be interesting to see how this polishing project works out. And if we can still walk when we get back home after doing a big section of hull.

Easter Sunday
 On the list for today was to install the two deck drains on the starboard side. This would be done while Frances prepared ham and scalloped potatoes for dinner. Did I mention the cherry pie? God, that woman can cook!

The starboard deck drains were going to be difficult. Having practiced on the port side, at least we knew the hose lengths. The starboard side had lots of stuff in the way. We disconnected the trim tab pump and some of the passive vent hoses so we could squeeze up under the deck. We did come up with a tool to tighten those 1-1/2-inch nuts that hold the drains in place. This adjustable wrench is probably older that I am. It's been in my garage for 30 years and it may go back to my father who called wrenches like this "all sixteenth wrenches." It worked perfectly to tighten down those drains.

 How do you hold the thru-hull fitting while trying to tighten it from below the deck? This worked perfectly for us. Maybe we'll send it off as a "tip" to Power and MotorFart magazine.


We did bed the drains in BoatLife caulk. They look and should work much better that the old ones.


Too bad that a simple project like this took us two weekend days but at least it is finally off our list.

Before we left for home, we had to take one more walk down to the river. It isn't particularly high, which just might mean that then spring freshet will be minor this year. Let's hope so.

The wind was blowing and it started to rain. Still, the docks for the small boats are in and the next dock down river are also in. Good sign. The boat yard crew seems to have some energy this year.


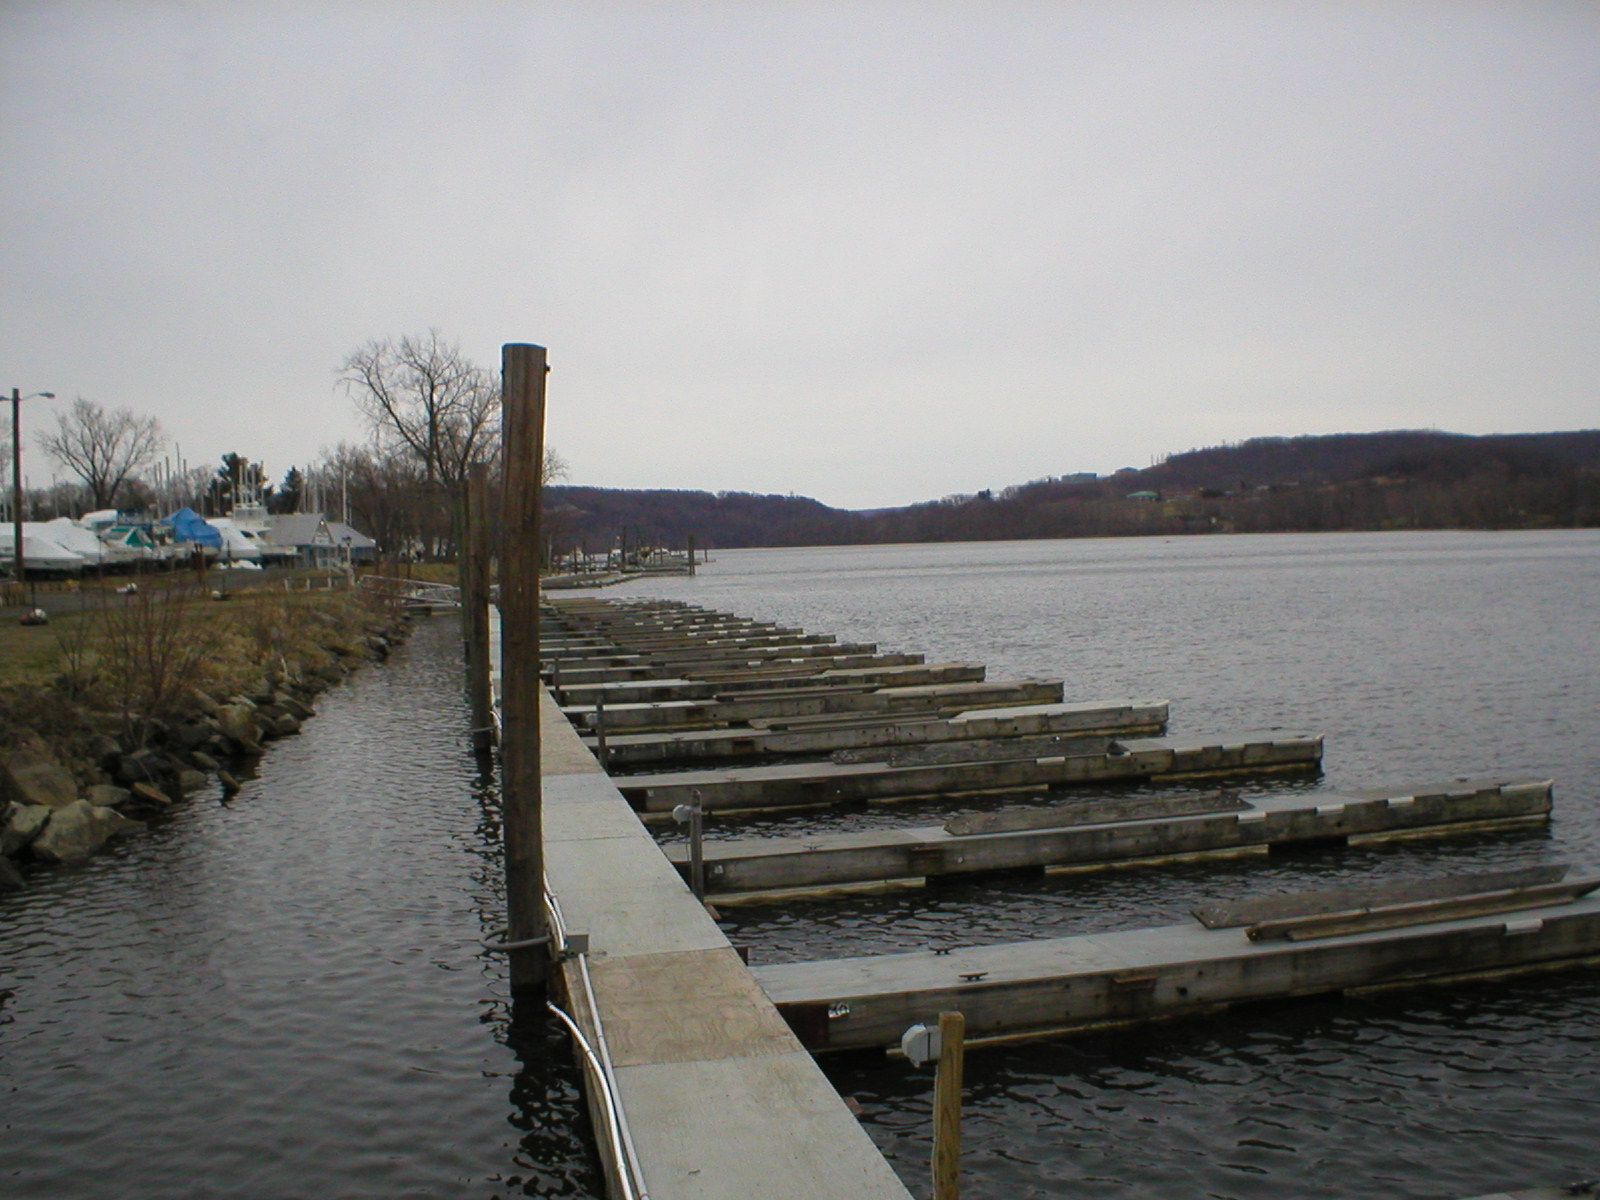
The boat yard only lost one spile this winter and a new one has been delivered and is ready for installation. The guy who installs these things arrives every spring. His little tug and barge are tied up just out of sight in this photo, at the marina that is down river from where we are. He has his own way of doing business. You need a spile? He drops one off after you pay for it.  Want it installed? You pay and there he is, one senior citizen, working the controls and he puts it exactly where you want it. He doesn't say goodbye. He just fires up the diesel in that little tug and heads up river to the next marina.


Not a bad business plan for a guy who doesn't want to spend his days in some retirement community.

Saturday, March 23, 2013

Something purely cosmetic for a change

Before we left the boat last weekend, we masked the side windows in the cabin. Our intent was to prime and paint the aluminum window frames, but the weather was a little too cold for that.

This week, the weather was considerably more pleasant with the sun warming the boat nicely. We erected our ladder and primed and painted the starboard side window frames using Rustoleum gloss black paint, applied with a brush.  The paint, or whatever it was that Silverton originally used, had either worn off or had taken on a very worn appearance.  It looked a lot better when we finished, although we doubt that anyone will ever notice it.


Then we finished painting the port side frames.  We hadn't intended to paint the frames around the front windshield but since we had the paint and masking tape right there, we decided to do that too.


The front windshield frames look really good, although no one will ever see it because during the summer, we have a Sunbrella cover for these front windows. Without that cover, our 16,000 BTU air conditioner can't keep the cabin really cool on the hottest summer days.

(Doesn't our little table lamp look cheery down in the cabin? In six or eight weeks it's going to look even more cheery because the boat will be in the water and we'll be sitting next to that lamp enjoying a cocktail.)

It took hours and a half a roll of painter's tape to mask the windows properly but it was worth the effort. A stupid photo?  Probably, but we had the camera there, so what the hell?


 Another thing on our winter list is to replace this cruddy deck fill for our water tank. Not only is it a piece of cheap plastic (or something) crap, but the cap is marked "Waste."  This drives Frances nuts because she's afraid that during the summer, the dock guys will stick their hose down that thing and pump the water out of our tank, leaving behind enough bacteria to kill us both.


We pried the old deck fill up just to check on the hose size. We want to order a new one this weekend before te Defender Warehouse sale ends. Might a well save a few busk where we can.

On Sunday, we began by replacing the covers that go over the drains on our newly painted salon windows. We have no idea what these things are made of but they are flexible and had a lot of dirt trapped behind them. When we first removed them prior to painting the window frames, we took them home, cleaned them up and then applied ArmorAll, the first coat of which was absorbed instantly. We applied a few more coats and eventually it began to build up on the surface. Maybe this will extend their life for a while.


Next we tackled the deck drains. They are located in a channel at the rear corners of the cockpit deck. Beneath the deck, those two drains are connected via a tee to two more drains that are under the engine hatches. The drains themselves are actually just 1-inch mushroom head through-hull fittings. Everything was connected using a variety of 1-inch ID hose types that lead to two through-hull fittings in the transom, just under the swim platform.

The mushroom heads on the drains allowed dirt to collect around them and they always looked terrible. Towards the end of last season, the port drain clogged up with something so today, we removed all the fittings, clamps and hoses from both sides.


Getting the hoses off the fittings at the corners of the deck would have been easy if we weighed 70 lbs. and had six foot arms. We did get in there eventually and applied out trusty heat gun to get the hoses off. We also found the obstruction. It was a tiny round piece of plastic and we know how it got there, but we won't tell except to say that the crew member who put it there has furry paws.

We've ordered new deck fittings that have a very thin top (instead of the mushroom head) and that should let dirty water and debris drain more easily from those corners.

Before leaving, we masked several of the steps on the ladder leading to our bridge.  We refinished that ladder completely several winters ago but have since noticed that when going up and down that ladder, we step on exactly the same spot on each step. That has worn the finish off the step.


We'll build up four or five coats of Sikken and that should hold us for a couple of more seasons.

It's also time to change the port and starboard running lights to LED types. We may have to hunt around a little for exactly the same type and style of light but the research is fun.


Thursday, March 21, 2013

Twenty Years~Forty Steps


The Admiral spent last weekend celebrating her cousin Sallee's 20th Anniversary Dance Concert in Nahant, Massachusetts. Sallee is the Artistic Director, Choreographer and Dancer with the Troupe, Forty Steps.


The concert was held in the round, inside Nahant's historic Town Hall, and played to a full house.


In between sets, we were entertained by an exquisitely talented violinist, Susan Krasner-Goldstein. The resonance and acoustics were exceptional.  There was not a nodder in the audience. 

Here is a link to a video montage of the dress rehearsal-just copy into your browser:
      http://vimeo.com/62104541

There was an after party at Duncan's and Sallee's from 11 to ~~~~~~~~
Here are a few pictures of  the gathering:

On Sunday we had a scrumptious brunch at ~~~~~~~~~~~~~~with a view of ~~~~~~~~~~~~

We then toured the island, starting with the famous forty steps down to the beach

There we had great luck finding lucky rocks (striations visible on both sides of the stone)

Also, we were able to pick up quite a few sea glass.

Another interesting find and actually an historic particular rock, purple in color

Seagus Iron Works


Saturday, March 16, 2013

The search for a hatch

We removed the old center hatch last weekend and brought it home. We needed to measure it accurately before we could start to search for a new one.

22-1/2" X 22-1/2" with a radius of about 4-1/2" was what t was. We also found a part number on it: Taylor Made 66016. Seems that Taylor still makes hatches but nothing even close in size to our old one. That's okay by us since Taylor isn't exactly the quality level we are looking for.

It seems that there are only about companies that make hatches and after a lot of Internet searches, we  found a Bomar hatch that measures 22-1/8" X 22-1/8."  We felt that we could build up the opening in the deck to accommodate that extra 3/8" We called Defender Marine (they show this hatch in their on-line listing) only to be told that "Bomar is slow. Delivery would be 6 to 8 weeks." We intend to be in the water in Norwich by then, so the old hatch took on new value.

Oh, the price of the new Bomar hatch? $560.00. We shopped that price around but found that Defender (where we could pick it up and avoid shipping charges) was the best deal.

We'll order the new Bomar hatch this week, but in the meantime, we'll need the old hatch re-installed.

The opening in the deck was pretty grungy with all the old adhesive still there.


We applied our trusty heat gun and soon, the mounting surface was  fairly clean.


We did the same heat gun routine the the mounting surface of the old hatch and then slipped it
 back into position.


We would have secured the hatch properly but we still have to deal with that crack.  We can repair it but not until the temperature gets to a nice solid 50 degrees. Probably a good time to get rid of that unused anchor cleat just forward of the hatch, too.


So, for now, we'll move on to other things on our list.

On Sunday, we made up a new battery cable from the 1/0 battery cable that we had left over from rewiring our old Chris Craft. We have one of those massive crimping tools on loan  to the boatyard so we stopped in the office and used it to crimp on new connectors.


Last time we were down working in the battery area, we spotted one cable that looked fairly crappy. Our new cable would be the replacement..


Actually, all of the old battery cables on this boat could use some work, although that will have to wait until next winter. The cables that the PO installed are a mixture of  sizes (mostly # 2 and # 4) and as you'll see in the next  photo, they aren't color coded correctly. (That jumper paralleling the grounds on the two port batteries should be black.) Anyway, we replaced the crappy old cable with our new one.


In doing this, we had to dismount one of the two Perko battery selector switches. No sense doing a half-assed job, so we disconnected everything, burnished the connectors that connect to the battery switches, coated everything with electrolydic grease and reconnected everything.

Before we closed the engine hatches, we checked the grounds. They run from the batteries to a bolt on the back of the transmission housing. There they meet another cable that runs to the same place on the other engine. We pulled those off too, burnished them and reconnected everything using electrical grease. Note to self:  There are much better places on the engine blocks themselves to make a primary DC ground. We'll take care of that next winter, too.

We closed everything up and went to the next thing on our list.

We've been lugging around 200-300 feet of old, dried-out anchor line that has been stored in a plastic milk crate in the space under our v-berth. It was there when we bought the boat and it was time to save a little weight by removing it. It probably weighed 75 lbs. With new summer's gas prices at $5.00 to $6.00 a gallon, any weight saving is worthwhile. Of course, if that was 75 lbs. of vodka, we would have happily left it there.

Next, the aluminum window frames along the sides of our cabin look pretty shabby. The black paint (or whatever it was) that Silverton applied had worn away in places. We want to repaint with black Rustoleum but first, we have to tape off adjoining fiberglass. Up we went on our ladder and carefully masked the areas on which we don't want black paint.


Last winter, we used black Rustoleum, applied with a brush, on the frame that surrounds our sliding door and it has held up perfectly.

It's still too cold here to paint but we'll get to that soon.

Sunday, March 10, 2013

Off the bridge and on to the front hatch


With the lower and upper helm wiring just about complete, it was time get down in the engine space and connect the new bridge 12-volt supply wires to circuit breakers and complete the new supplementary ground wire to the batteries.

We mounted the 40-amp circuit breakers in the 2x4s that reinforce the deck under the siding glass door. It made a nice neat installation since it can't be seen by the casual engine observer but is close enough so that the circuit breakers can be reset, should they ever trip.


These little circuit breakers are marine-rated and have a tiny trip lever that can't really be seen unless the circuit trips. The battery supply is on the left and the cables to the upper and lower helms are on the right.

We went up to the bridge make one last check of the connections and then turned on the marine VHF radio, the chart plotter and the radar. No one answered us on channel 9 but the chart plotter did eventually get a fix which showed our position to be across the river in Middletown. Oh well, we are inside a metal shed.  The radar showed that the river was free of traffic. Then, while we keyed the radio, we sounded the air horn. Beautiful! We got a nice honk and the other electronics worked perfectly. That wouldn't have been possible before we added that extra capacity 12-volt wiring..

We made some voltage measurements and noticed that  the voltage at the "BATT" terminals of the ignition switches was around 11 volts but the accessories (radar, radio, horn, etc.) were getting 13+ volts DC. It seems that the ignition circuits for both sides were still connected only to the boat's original wiring but the accessories were getting full battery voltage via our new wiring.. We made up two new connections between our new +12-volt feeds and the BATT terminals of  the bridge ignition switches.

That was exactly what was needed. The voltmeters (that are on the ignition circuits) now read as they should. Glad we poked around that wiring before moving on to our next project.

On Sunday, we wanted to devote some time to cleaning up the bridge and give it a thorough vacuuming with our little shop vac.


We did that but before we closed up the upper helm, we added one more electrical connection: a DC power cable for our Acer Netbook computer.

Why would we ever need a small computer on our bridge? Well, probably never because we do have a chart plotter, but our little Acer is loaded with our absolute favorite navigation software, PolarView. (Thank you, Active Captain for recommending it.) We seem to remember that the PolarView software was about $30 (including any charts that we care to use) and we opted to invest another $12 in a USB-type GPS receiver that is only a little bigger diameter than a silver dollar. How will we mount the netbook? No idea right now but we'll look around and see what we can find.

The five foot long Acer power cable stores nicely behind the radar and since there is circuitry that changes 12-volt DC from the boat's electrical system to whatever voltage is required by the Acer, we added a switch to turn that power off when we aren't using it.


Damn! Now that we're posting the photos, we notice that the switch is crooked. We'll fix that because it looks really bush league that way.

Hey, we love gadgets, especially on our boat.

Next project: replacing the front hatch
Replacing this hatch has been on our radar for some time. It's original equipment on this boat and the latches were in sad shape. Last summer, it started to leak, so replacing it became much more important.
We weren't looking forward to getting the old hatch out but after removing 14 one-inch stainless screws and a little lifting, it came right off.

The headliner in the v-berth is stapled up around the hatch opening and amazingly, it wasn't in bad shape. The adhesive (if that's what it was) around the outside of that hatch was uneven but still had a little tacky quality to it.


On closer examination, we found a crack on the edge of the raised section on which the hatch is mounted. You can see it when we zoom in on this photo.


That is very likely where the leak was coming from and we'll repair that quire easily.  The problem is, where do we find a replacement hatch?  The Silverton Owner's Club tells us that that hatch is no longer made. We're going to turn the search over to Frances, who can find anything n the Internet.

In the meantime, if you know of any sources for a hatch with these specifications, please let us know.

The old hatch is marked: Taylor Made # 66016

22-1/2" X 22-1/2" inches.


Monday, March 4, 2013

Still rewiring the fly bridge


We took Saturday off from the boat to visit the New Britain Museum of American Art to see the current exhibition, Toulouse-Lautrec & His World. It was a great opportunity to see and read about many of his lithographs that have become so familiar and examine literally hundreds of his sketches, some of which are beautiful fragments on tiny pieces of paper.  The information displayed about each item in the exhibition was as fascinating as the drawings and lithographs themselves.

This museum is simply a gem with a collection that numbers over 10,000 items.  Even if you get lost in New Britain trying to find it, the New Britain Museum of American Art is well worth a visit.

Sunday found us back on the boat but not before some substantial nourishment from some prize-winning french toast courtesy of Frances and the Sunday New York Times.

Once on the boat, we uncovered the bridge, collected our tools and assumed the position on our back under the upper helm. In a previous post, we described installing terminal strips for making the numerous connections +12 VDC but that needed a little more work to separate the loads fairly evenly between the port and starboard battery banks.

Even more important was the ground circuit since all the current drawn by everything returns to the batteries on the ground wires.  Silverton used two 16 gauge wires from the engine blocks to the lower helm and then to the bridge. We added an additional 8 gauge ground cable for the lower helm and an second one for the bridge. The question was, how to connect all those grounds from the radio, radar, depth sounder, etc., in a way that would give each circuit the best conductivity.

We found a ground buss bar made by BlueSea. Not inexpensive, ($12.95 each), but just what we were looking for.


It's made of tin plated copper, so you have to go easy when tightening things down.

We began on the starboard side, wiring our new #8 ground cable to one end of the buss bar and then running a second section of #8 cable to a second buss bar mounted on the port side. We re-routed and reconnected to the buss bar as many grounds as we could. In some cases, we left the connections to a previously installed barrier strip in place, since they don't carry much current. A couple of contacts on that barrier strip are used to make GPS connections from the chart plotter to the radio and the radar and since they work fine, it is good enough for now.

The starboard side looked like this:


 We know how sloppy this wiring looks. A couple of times we have considered removing all of the bridge wiring and starting over but for now, spring isn't far off and a project like would take us a month or more.  Besides, sloppy wiring is pretty common in production boats since it's hidden from view. Maybe we'll rehabilitate this bridge wiring next winter..

On the port side of the helm, we had some difficulty finding a place to mount the ground buss bar. We ended up moving the previously installed +12 volt terminal strip up a little to make room.


The +12 volt terminal strip comes with a neat plastic cap that covers and protects the contacts. Like the starboard side, we left the previously installed terminal strip (shown at the top left) where it was. The right side provides grounds and the left side is +12 volts. There are only two connections left on it and neither are critical.

Those coils of gray wire shown at right are from the radar. Unfortunately, those are wires we can't cut and shorten.

The primary DC connections to the bridge are now all in place. The new #8 cables effectively parallel the original factory DC wiring so we should have ample capacity even under maximum load conditions such as radar on, marine radio transmitting and operating the air horn all at the same time. Actually, that could easily happen if we were operating in the fog.

This bridge wiring project involved removing lots of old wire and butt connectors, terminals, masking tape and one old factory-original terminal strip.


The next step will be to connect the new bridge wiring to the port and starboard battery banks through circuit breakers mounted in the engine space.