Wednesday, March 10, 2010

Bridge Seating

Our fly bridge has two of those folding seating units that really make things crowded up there.  They are also quite low so that anyone sitting on one can't really see much looking ahead.

Last Sunday, we decided to remove one of these two seat units, thinking that for now, one of them up there would be enough.  Once we got it home and took it apart, it was easy to see how badly rotted the original 1/2-inch plywood base was. The base was built without the benefit of a single screw.  Everything was joined with steel staples and most of those had disappeared in rust. These things are original Silverton and you can still buy seats just like them at places like Cabela's.

However, the seats themselves were still in fairly good condition so we began thinking about building a new base.  We copied the dimensions from the old one so the old seats would fit and made a drawing. We could see where improvements could be made. We had enough 3/4-inch plywood on hand from what we bought to make the battery covers, so we could use that. The old seats were too low, so we designed the new base 15-inches high, rather than the 9-inches in the original.  Finally, since one of the two seats tilts up, we included a bottom in the new base so that the seat base could also be used for storage.

We skipped out of work at 2 PM and by 5:30 PM had a new seat base.  Everything is glued and screwed together with deck screws.  Here's the original Silverton seat base and its new replacement.


The forward seat is held in place by two little aluminum L-brackets and we ran out of light before we could put those in place today. However, the seats fit perfectly and whoever uses it will be able to see what's going on out ahead of us.


The color of the new seat base is bring studied by Frances.  I suggested filling the screw holes, priming it and painting it white but that suggestion was met with less than enthusiastic agreement. We'll see. Can't spend too much more time on this.

It may be boring for you to read about how someone made a small plywood box in an afternoon. But, it's fun for us to improve this old boat without spending a fortune and using as much of the original equipment as possible.

Saturday, March 6, 2010

Just a little piece of hose

Before we left the bilge, we wanted to fix one more thing on this fall's list. A little drip at the cold water inlet on the hot water heater. The cold water hose runs from the water pump, across the bulkhead behind the engines and connects to a T fitting. One leg of the T goes forward to route cold water to the sinks and toilet. The other leg, just a 12-inch section of 5/8" ID flexible hose, provides cold water to the water heater. The drip was where that little section of hose was clamped to the fitting on the water heater.

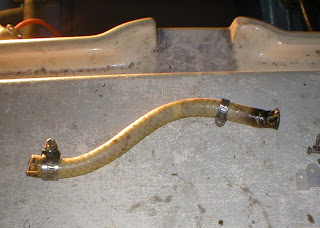
The problem was - and there is always a problem with fixing anything on an old boat - that in order to get to the leaking hose, we'd have to remove or at least push out of the way, the ventilation hoses and there were several. First we disconnected the vent hoses from where they were clamped to the bulkhead. Once they were out of the way, we could just barely reach the leaky section of hose. We used a utility knife to get this Silverton-original piece of hose off.


The discolored end at the right is where it had been leaking for who-knows-how-many years.
We bought a foot of new 5/8" ID hose and, after applying our trusty heat gun to soften it up, put it in place with new hose clamps. 

In the photo below, notice the two T fittings at the inlet of the water heater. Only one is really needed and even that could have been an elbow. The first T fitting has a plastic 1/2-inch hose barb adapter screwed into it to accept the hose that we replaced but that hose barb should be 5/8-inch, not 1/2-inch. That's probably one reason why it leaked.  We're hoping that the new heat-softened hose and hose clamp that we used will take up that extra 1/8-inch and not drip. If it does, we'll have to fix that next winter when, we hope, are arms will be about a foot longer. Failing that, we'll have to remove the entire water heater and re-plumb the hole thing properly.


Then it was time to fix the entire ventilation hose problem. The vent hose is actually 3-inch hose that was once used to vent the hot air from residential clothes dryers.  It is no long legal for residential use but is still used in boats where the air isn't heated. You can buy aluminum connectors for 3-inch hose and we got a handful of them.

The inlet hose on the bilge blower had long ago fallen off.  Several sections of hose where punctured and/or ripped open and hanging by the support wire.

We cut out all the damaged hose and using the connectors, added new hose. We reconnected the hose to the bilge blower and clamped it in place. For most of the hose connections, we added duct tape. It isn't all that sticky at 40 degrees, but if you give it a minute or two under the heat gun, duct tape conforms and sticks perfectly.  We hope we'll never have to take it off.


We also used duct tape at each place where the hose was supported so that when we tightened the cable ties, they wouldn't collapse the vent hose. 

Notice the charge indicator lights on the battery charger? All three are green, showing that the batteries are fully charged and ready to go. We've kept them that way all winter by plugging in the boat's power cord for 24 hours each weekend.

When we had the last survey done on our last boat, Mad Dog, the surveyor told us that we needed two bilge blowers, one for each engine.  We have only one right now on this boat and that's going to have to do for this year.  Adding a second bilge blower shouldn't be difficult next winter. (Yeah, right!)


We were going to get out of the bilge and move on to other things but decided to do something with the undersides of the engine covers before we did.  The PO had used contact cement to glue pieces of fiberglass insulation to the undersides of these big heavy hatches apparently in an effort to cut down on engine noise. If that's the reason for the fiberglass, it didn't work. The fiberglass was shredded and hanging loose in places so we hand scraped all the old stuff off, holding a Shop Vac to suck it up as it came off.

The engines hatches weren't pretty after this but at least the shredded fiberglass was gone.


We used a small roller and a chip brush to paint the undersides of these hatches.  It doesn't make the boat run any better but it sure improves the appearance.


OK, now we've out of the bilge and ready to start painting the trim and the bottom. We are so glad to see the engine space doors closed. It feels like we spent weeks down there.

Sunday, February 28, 2010

The scuppers

Being able to move between the engines has given up the opportunity to to do a lot of unexciting but important maintenance stuff.  These Chrysler engines are unfamiliar to us so we took some time to get acquainted. That included: examining the spark plugs (all brand new and gapped properly); replacing the plug wires; checking the lubricant levels (very clean engine, transmission and v-drive oil); checking the caps and rotors on the electronic distributors (looked like new); examining the cooling water hoses to and from the heat exchangers (all perfectly adequate without leaks).  Then on to the water system. We replaced the 12-volt water pump that supplies fresh water to the sinks and toilet while underway. the old one was dead. We found a small drip-leak in the cold water supply hose to the hot water heater. We'll replace that soon.  We also removed and tested both bilge pumps. The aft pump was dead and we replaced it with a modern 1,200 gph pump with an external float switch. The other pump worked fine.

The passive ventilation system to the fuel tank and engine spaces is complicated, with lots of 3-inch vinyl dryer hose running from the vents on the sides of the hull to various places. Some of that isn't in good condition and we've replaced sections of it as we went along.

Before we closed the engine hatches and with the work light rigged up, we decided to rehabilitate the scuppers or cockpit drains. There are four scuppers - one at each aft corner of the cockpit and one under the aft corner of each engine hatch. They are designed to catch rainwater or (under very bad conditions) sea water and drain it out through two thru-hull fittings in the transom, just below the swim platform. The drain plumbing was in a pretty sad state and we knew from washing the boat in the fall, that they were probably at least partially clogged and were leaking a lot of the drain water into the bilge

This is how the hoses connecting the starboard scuppers looked before we began the rehabilitation.


The 3-inch vent hose on the left is part of the passive ventilation system that we mentioned above. We relocated that temporarily to get at that the rat's nest of aged electrical tape that was holding the leaky T-fitting connecting  the two hoses from the deck above. This area, up under the cockpit liner, is extraordinarily difficult to get to unless you have six-foot arms.

While trying to remove the old hose on the starboard side, we broke off the neck on the thru-hull fitting.  Luckily, the marina had one in stock.

Ninety minutes and two bruised knees later, we had properly working starboard scuppers.


That galvanized metal box with the rust stains at the bottom of the photo is the starboard outboard exhaust muffler, a Silverton original. The other three mufflers had been replaced with modern ones when we got the boat.

Then we attacked the port side.  The "before" condition was just as bad as the starboard side, so we removed everything and started over with all new 1-1/8-inch hose that is smooth on the inside so it won't catch debris as the old lumpy plastic hose did.


We took this picture by holding the camera at arm's length into the space next to the port side hull, which is at the right. Straight ahead is the transom. Notice how rainwater that drained over the years apparently leaked down the inside of the transom. No wonder. The thru-hull fitting was so loose that we could back off the mounting nut by hand. It's nice and tight now.

Note also the rusty bolts coming through the transom. Those are the mounting bolts for the swim platform, also Silverton original. The backing plates, if you can call them that, are plywood. I guess that's something else that we'll have to replace next winter.

So, one Sunday afternoon and the cockpit will drain properly. The job yielded quite a lot of trash for such a small effort. I wish the PO didn't fix everything with electrical tape.


We'll be out of the engine space soon, but first we need to fix that leak at the water heater. It's a 15-minute job that on a boat takes two hours.  Frances has asked for a fresh water spigot somewhere in the cockpit and we'll get that done, also in the next few weeks.

This has been a cold winter but also fun for us.


Saturday, February 27, 2010

Still in the bilge

Work continues down between and around the engines. We did miss a weekend day or two due to other commitments and fabricating the covers for spaces between the stringers and over the batteries took a little longer than expected.  It really wasn't practical to build the the covers on the boat because there isn't much room to work with the engine hatches open, it is dark even with the work lights on and for at least a couple of days, it was just too cold.

Once we got the two aft stringer covers finished and painted, that gave us access to the space where the batteries are located. After we measured for the two pieces that would cover the batteries, we removed all of the cables that are connected to the batteries, cleaned all of the battery posts and cable contacts, applied electrical grease and reconnected everything. We also re-routed quite a few of the cables and pulled out some old, unused wiring.  Once the covers for the batteries were fabricated and test fitted, we found that they had to be modified further to fit properly. After they were test fitted again, we took them home and painted them. The covers between the center stringers aren't bolted down. They simply rest on the stringers, which seems to work fine. With everything in place, they looked like this:


Now we could crawl forward between the engines and easily check the fluids in the transmissions and the v-drives. We found the starboard v-drive was about 1/2 quart low on fluid, which we replaced. Interesting that the v-drives use ordinary 30 weight engine oil.  

While up there behind the engines (remember that our engines are mounted so that they face backwards) we scooped up about two pounds of greasy old leaves, a 9/16" socket, numerous small bolts, electrical connectors and several lengths of wire.We also found a disconnected bilge blower hose, which we reconnected. With that out of the way, we attacked the newly accessible area with a Shop Vac. From the sounds the Shop Vac made, we sucked up lots of other debris. With that done, the bilge actually looked quite nice. Well, nice to us.

While we were down there, we checked the fluid in the hydraulic steering reservoir, which was OK, except that the cap for adding more fluid resisted coming off, even with a big wrench. We'll get that off. It will just take a little time. We pumped the steering pressure up to the recommended 25 lbs. pressure and checked the steering, which worked fine, just as it had before. We also tried operating the Bennett Trim Tabs. Amazingly, they worked, although a little slowly. Nice to know that they work, although I don't think we'll ever use them much.

Tuesday, February 16, 2010

Nothing like a nice smooth bottom

When we bought this boat in July of last year, it had been shrink-wrapped in outside storage for some time. From what we could learn, it hadn't been used much in the past three years or so and when it was in the water, it stayed at the dock most of the time. Apparently, the bottom had been painted numerous times with black ablative bottom paint.  When we first saw it, the bottom was rough to say the least.


When we got the boat out of the water for winter storage, it was amazing to see and feel how many layers of paint were still on there - in places. We also wanted to know what was under the remaining paint. In other words, were there cracks and blisters that would have to be repaired.

Having never stripped the bottom of a fiberglass boat before and knowing that we had a long list of things to do over the winter, we hired the marina's fiberglass repair guy to strip the bottom.

Beginning in mid-January, Bernie (the fiberglass guy) stripped off all of the paint using just hand scraper.  Over about four weeks, he removed two ten gallon buckets of old paint, which he had collected in a tarp.

Every time I saw him on weekends, he'd tell me something about what he was doing.  Were the blisters?  No, he didn't find any but didn't expect to find on a Silverton of this age. He did find some tiny cracks near the bow that were hard for me to see.

"Nothing to worry about but I'll fix them anyway," was his response.

I was amazed at how smooth the bottom of the boat was but Bernie said there was more to do. Over the next week, he sanded the entire bottom using 100-grit sandpaper. This revealed every little nick and Bernie filled and restored the Gelcoat to every one of them. He also found some other spots that needed attention on the boat and repaired them as well.

Here's the newly smooth bottom:


The recommendation for painting is one coat of Interlux Bottom Coat and two coats of ablative bottom paint - in a different color - over that. Can't wait to start that job but we're told the temperature has to be consistently over 40 degrees before the paint can be applied. We'll also repaint that boot stripe in the same brown as used on the accent stripes on the cabin sides.

Bernie is a boating resource and we're listening to everything he has to say. He knows more about fiberglass boats that we'll ever know and that's not much considering that we've never owned one before.

Wednesday, February 10, 2010

Into the bilge

The bilge isn't a pretty place. On our boat, it's a giant step down from the deck into the space between the engines, both of which face aft because the boat has v-drives. Our goal was to make some simple covers for the space between the stringers. That would enable us to step down onto something solid when we had to do engine maintenance and also provide a place to store oil and other stuff underneath. Without these covers to step on, it's a long way down there.


We arrived at the marina just after the Middletown power plant explosion and saw the emergency equipment racing down the road across the river. We had no idea what had happened and went into the bilge to make one final measurement of the distance between the stringers. "Measure thrice and cut once" is Frances' advice and in this case, it was worth doing.

The covers certainly weren't difficult to make out of what today passes for 3/4" plywood. We primed them and then painted them with two coats of Benjamin Moore house paint, which we had on hand. In the past we've found that good quality house paint is really tough and can take abuse.


Our lifting handles are stainless U-bolts held in place by stainless stop-nuts. That's what Silverton used on the engine hatches so they should work for the stringer covers.

Here's what the new covers look like installed.


Now that we have something to stand or kneel on between the engines, we'll figure out how to make a cover for the area over the batteries that is just forward of that.  Exhibiting typical Silverton design excellence, the four batteries are simply sitting between the engine stringers in a compartment that very roughly holds them in place. From what I remember, marine batteries are supposed to be held in place and covered in a way that will vent battery gas. What we have now is pretty sloppy.


How about all those red battery cables? Luckily, I know where they all go. It would be nice if the ground cables were black but for now, we'll have to make do with what we have.

This area will also have to be covered so that we can crawl up there between the engines to service the transmissions and v-drives.  Crawling over batteries is very hard on the knees and can expose you to battery acid, which will quickly burn a hole in your shorts. We'll have to add partitions to that space to hold the batteries in place and also re-route some of of that primary wiring before we can fabricate a cover.

This is going to be a lot of work but, that's what we like. It's also one of those improvements that no one will ever see but we like to know that things have been done right.

Monday, February 1, 2010

OK, we missed a weekend

Saturday morning at 7 AM was cold. Not just ordinary New England-in-winter cold but a frosty 5 degrees on my back porch. I dressed as warmly as possible and then began to think about what it would be like on the boat in that metal shed. At about 9 AM, when it didn't get much warmer, I gave up and decided to stay home and work on another, although relatively minor, boat project.

This boat has Judson Sync indicator on it, although it apparently doesn't work. We installed a similar Judson Sync Indicator that we bought on Ebay on our last boat and we loved it because it made it easy to adjust the two engines so that they were running at exactly the same speed, thus saving some fuel and minimizing vibration. The sync indicator is a neon bulb mounted in a torpedo shaped housing.  You can see the one we have at the extreme left in this photo with its dead round eye looking out. It's next to the Eagle Fishfinder, another piece of legacy electronics that will eventually have to go.


They don't make these things any more and the alternative today is a sync gauge. I searched around for a nice small one that I could mount in the gauge cluster, but no luck. The only one I could find was a Faria sync gauge that was 4-inches around, and that's a big gauge, too big to mount in the existing instrument cluster.


Since that was our only available gauge, I bought one and then had to try to figure out how to mount it. I located a spot at the upper helm that had many holes drilled in it from past electronics that were now gone and decided that I could build a small enclosure that would hold the sync gauge and a depth gauge.  Here's the mounting point that I think will work. It's on the starboard side of the compass.


I had been thinking about this and took some measurements so, instead of going to the boat and freezing my butt off, I spent the afternoon of January 30 building a nice little "box" for the gauges that will mount on that spot, making the gauges easily visible without blocking my forward vision. It's been fiberglassed and is curing now.

Here's a picture of it after rough fiberglassing with the gauges in place for a test fit. In the picture, I've propped it up at the approximate angle that it will mount in that space at the top of the bridge console.


I made this enclosure wide enough to also hold an inexpensive Uniden Depth Gauge. We have a 1990s era "Fishfinder" that works but I prefer just seeing the depth so maybe sometime soon, we'll install a transducer for the Uniden. I'd just as soon remove the old Fishfinder but we may not have time to that this winter.

Just so you understand that Frances and I aren't complete winter outcasts, we went to the Hartford Boat show on Sunday with our friends and dock-mates Carol Anne and Rob. The show was OK. The conversation was, as always, fun, stimulating and full of spice. CA and Rob will know what I mean by "spice.".